Setting Up Enhanced Document Management
Click here for a video demonstration of enabling and setting up Enhanced Document Management.
After you have purchased and registered the Enhanced Document Management PAL, follow these steps to enable and set up Enhanced Document Management. Note that once Enhanced Document Management is enabled, all documents will be encrypted and moved to the Document Repository (the secure server location designated during setup).
Before you start the process, do the following:
-
Back up your database and document files.
-
Ensure that all users are out of AbacusLaw.
-
Exclude lawwin.exe from the anti-virus scan.
-
If your server has a dynamic IP address, use a friendly name for the server (instead of the IP address).
Follow these steps to enable and set up Enhanced Document Management.
-
Purchase and register the Enhanced Document Management PALS.
-
Select File > Setup > System Options.
-
The System Options window appears. Select the Features tab.
-
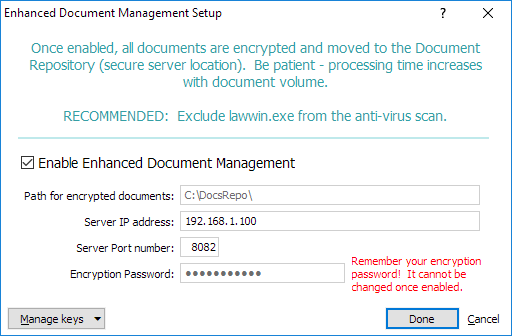
Click the Settings button for Enhanced Document Management. The Enhanced Document Management Setup window appears.
-
Check Enable Enhanced Document Management.
-
Enter the path where the encrypted documents will be stored. This needs to be on a local drive (no UNC) and needs to be visible from the server where the service is being configured. Note that this path cannot be changed once Enhanced Document Management is enabled.
-
Enter the IP address for the server where the encrypted documents will be stored.
-
Enter the port number for the server where the encrypted documents will be stored.
-
Enter the encryption password. IMPORTANT: Remember your encryption password. It cannot be changed once Enhanced Document Management is enabled.
-
Backing up the encryption password locally and/or off site is highly recommended. Without the password, access to documents is lost. Click Manage keys and select any of the following:
-
Save password/Restore password: Click Save password to back up the encryption password as a token (TKN file) to a local path. A window appears that will allow you to select the path to store the backup token. Once saved, click Restore password to be able to restore the encryption password as needed.
-
Save to Azure Vault/Restore from Azure Vault: Click Save to Azure Vault to back up the encryption password as a token (TKN file) in the Azure Vault, which is in a secure off site location. Once saved, click Restore from Azure Vault to restore the encryption password as needed.
-
-
Click Done to save your changes.
-
If a UAC prompt displays, click to allow the action in order to configure the document service correctly.
NOTE: Higher volumes of documents can take longer encryption processing time.