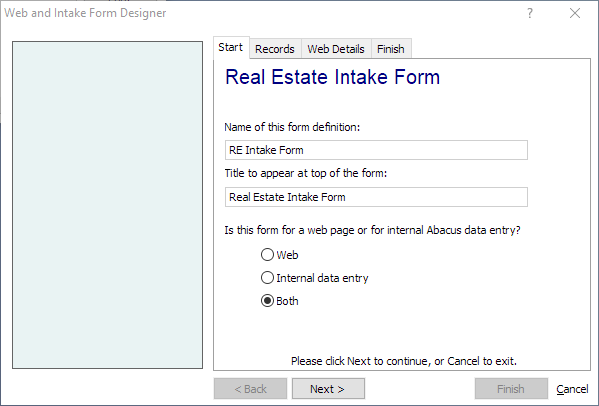
Web and Intake Form Designer
The Web and Intake Form Designer appears when you select to add, clone, or edit an Intake Form.
The Web and Intake Form Designer is a wizard, so when adding a new Intake Form use the Next button to walk through the tabs in order, from left to right. For later editing, tabs can be individually selected as desired. This topic describes each tab on the window.
Start Tab

The Start tab asks for general information about your Intake Form. The following describes each setting on the tab:
-
Name of this form definition: The name of the Intake Form file. This is the name that you see used in AbacusLaw.
-
Title to appear at top of the form: The title that will appear at the top of the Intake Form. This is the title that the user of the form will see.
-
Is this form for a web page or for internal Abacus data entry?: Lets you select the type of Intake Form. Web Intake Forms are used as a page in a web site that you or your clients access using an Internet browser. Internal data entry Intake Forms are Intake Forms that are used within your firm so that only your employees see the form. Note that you can select to have the form serve both purposes.
Click Next to move to the Records tab.
Records Tab

On the Records tab, select the database and then the database fields you want on the Intake Form. These database fields determine the type of data that is collected. For example, if you want to collect name information, you might add First Name and Last Name fields from the Names database to the Intake Form.
To maintain database fields:
-
To add database fields: Click Add a Record and select the database. The Intake Form Record Properties window appears, letting you add database fields.
-
To clone database fields: Highlight the database and click Clone Record. The Intake Form Record Properties window appears, letting you clone database fields.
-
To edit database fields: Highlight the database and click Edit properties. The Intake Form Record Properties window appears, letting you edit database fields.
-
To delete database fields: Highlight the database and click Delete. All the fields for the selected database are removed from the Intake Form.
To change record order:
The records in the grid are listed in the order that they appear on the Intake Form, from top to bottom. For example, if the Names record is listed first, then all fields added for the Names record are listed at the top of the Intake Form. To change the order of records, highlight the record and click Move Up or Move Down.
Click Next to move to the Web Details tab.
Web Details Tab

The Web Details tab lets you manage what happens when a web user submits the Intake Form. (If you are editing an Internal Intake Form, you can skip this tab.) In an actual Web Intake Form submission, the user's data is encrypted to maintain privacy and security and sent to your Abacus installation via an email account.
The following describes each setting on the tab:
-
Email address to receive the form when posted from the web site: The email address that receives submitted information from Web Intake Forms. Every time a web user completes and submits a Web Intake Form, the email address receives an email with the form information.
An email address must be entered OR a dedicated email address must be configured to continue. If you use a dedicated email address, this field can be blank. Note that if an email address is entered AND a dedicated email address is configured, the address entered here is used and the dedicated email address is ignored.
NOTE: The email address must be a standard POP3 account using standard TCP POP3 ports only (web-based mail services such as Gmail, Yahoo, etc. will not work). -
Optional URL to redirect to after a form is submitted: Enter the post-submittal web page URL. After a web user submits a Web Intake Form, this web page will be displayed to confirm that the submission has been received. This way the user understands that the submission process was successful.
Click Next to move to the Finish tab.
Finish Tab
The Finish tab lets you preview the Intake Form and then finalize it.
Click Preview to see your resulting Intake Form. The intake form opens as it will appear to the user. Make note of any changes that need to be made and close the preview window. Go back to any tabs in the Web and Intake Form Designer and make changes as necessary.