Customizing Database Structure
By default, the screens in Abacus only allow you to capture certain types of information. Many law firms need to customize their screens to display information that is unique to their practice. For example, one firm may handle Personal Injury cases and need to add several fields for specific data such as the type of injury or a police report number.
You can add, edit and delete fields to meet your firm’s needs. You can specify the type of data a field will accept and how it will accept it. For example, if you have a field called "Date of Injury" that must not be left blank by the user, you could require input.
With Abacus you can design database structure changes at any time and implement those changes later after everyone else has exited Abacus – a very valuable feature for busy offices because you don't have to shut everybody down. Since actually making the changes requires a complete re-writing of the databases, be sure to have a current backup first.
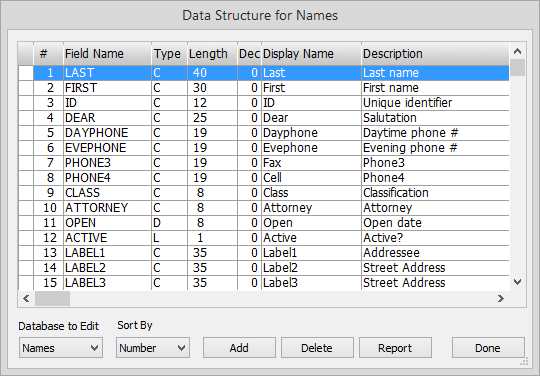
Database structures are maintained from the Data Structure window. To open the window, select File > Setup > Database structures.

Click the Database to Edit arrow and select Names, Events or Matters. (If you are working with an extra database, you cannot change this field.) The fields listed are the existing fields for the selected database. Not all fields appear on your data windows! Abacus has internal fields that it uses behind the scenes. These will appear in this list, but you will not be allowed to delete or change them at all. You have complete control over fields you add. The standard Abacus fields that do appear on your screens cannot be deleted, and we recommend that you not change them at all, but if necessary you can change the Display Name and Description. Some of them (like “Dear”) can have their lengths changed. Fields that are primary index keys like Last and First cannot be altered.
Do any of the following tasks from this window to change database structure. When you are finished, click Done to close the window. Note that when you click Done, the Pending Changes Exist window usually appears. See "Finishing Field Structure for the Database" below for more information.
To sort the list of fields
Click the Sort By arrow and select to sort by Number, Name, or Display (to sort by Display Name).
To delete a field in the database
Highlight the field and click Delete. The deleted field is marked with a red X. After you close the window and reopen it, the field will be removed.
To add a field to the database
-
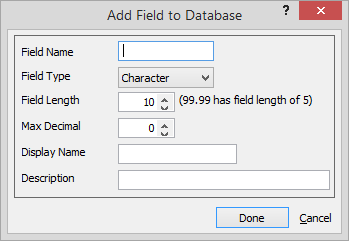
Click Add. The Add Field to Database window appears.

-
Complete the window as follows:
-
-
Field Name: Enter the actual name of the field. The first character must be a letter, and the next 9 characters can be letters, an underscore (_) or digits. Do not create fields that are the same name except for the tenth character (like NEW_FIELD1, NEW_FIELD2).
-
Field Type: Select the type of field. You can choose between several types: Character (which includes all letters and numbers and most symbols), Numeric (which includes numbers only), Date (which includes dates only), Logical (“True/False" fields that appear as a check box option) and HyperLink (which are used only for adding HyperLinks to screens).
-
Field Length: Enter the maximum number of characters for the field. Date fields are 8 characters, Logicals are 1, Numerics overall length includes any decimal point and digits. So if you want your data to handle a maximum integer of 999, length 3 is fine. But if you want to handle 999.99, the length must be 6 and the Max Decimal must be 2. TIP: If you are not using a standard field, you might want to shorten the field length to 1 to save disk space.
-
Max Decimal: Numeric fields may include decimals. This setting specifies how many digits are on the right side of the decimal point.
-
Display Name: Enter the name that you want to see in lists where you select fields, such as when adding fields to a new report or creating a query. Usually, this is just a more readable version of the Field Name. It must be unique; do not give two fields the same Display name.
-
Description: Enter the description of the field.
-
-
Click Done to save your changes and close the window.
To edit a field in the database
-
Double-click the grid cell containing the information you want to edit.
-
Once double-clicked, the cell is in edit mode. Make your changes as necessary and press Enter to save.
To print a list of the fields
Click the Report button. A confirmation window appears. Click Yes.
Finishing field structure for the database
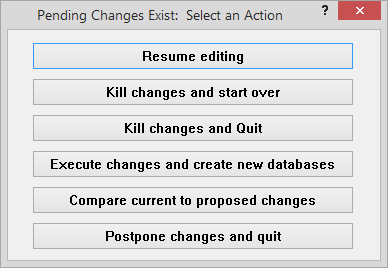
When you click Done on the Data Structure window, the Pending Changes Exist window might appear.

Select any of the options to finish the procedure:
-
Resume editing: Click if you clicked the Finished button too soon and would like to go back to the Data Structure window and make more changes.
-
Kill changes and start over: Click if you want to cancel your changes and return to the Data Structure window to start over.
-
Kill changes and Quit: Click if you want to cancel your changes and close the Data Structure window.
-
Execute changes and create new databases: Click if you have made changes and are ready to create the extra database.
-
Compare current to proposed changes: Click if you want to review the proposed changes (in a separate window).
-
Postpone changes and quit: Click if you want to keep your changes, but are not ready to create the extra database.