Setting Up/Disabling Email for MS Outlook
When you set up email for Outlook, you enable the Abacus Outlook Add-in. This add-in works in both directions to let you link emails to names and matters, and thereby, share them on your network:
-
Within Outlook, the Abacus Add-In adds a toolbar so you can link your messages to an Abacus matter or name. You can also save attachments as linked documents to a matter or name.
-
Within Abacus you can view the emails that are related to individual matters and names, and enhanced features take advantage of Outlook's capabilities.
-
Your linked messages and documents are automatically shared with all Abacus users (with control for "private" messages).
Setting up Email for MS Outlook
-
Select File > Setup > User Preferences. The User Preferences window appears. Select the Printing/Email tab.
-
Under Email Program, select MS Outlook.
-
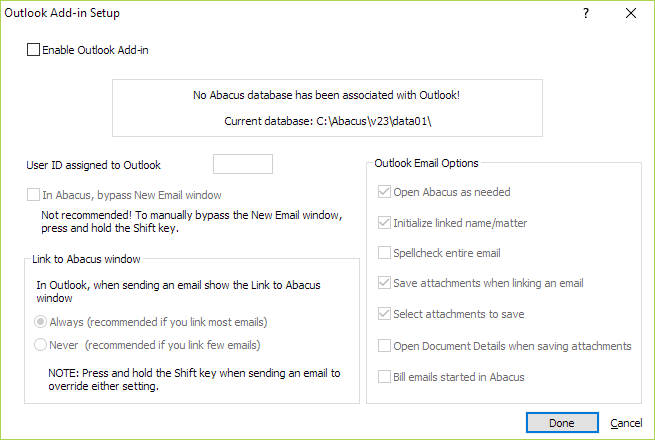
Click Setup. The Outlook Add-in Setup window appears.

-
Check Enable Outlook Add-in.
-
For User ID assigned to Outlook, enter you normal Abacus logon ID (if necessary).
-
You can check In Abacus, bypass New Email window so that you do not see the new email window, but this is not recommended. If you want to bypass the new email window manually, press the Shift key.
-
For Link to Abacus window, select Always if you link most emails to names/matters in Abacus or select Never if you rarely link emails to Abacus names/matters.
-
Configure Outlook Email Options:
-
Open Abacus as needed: Check to allow Abacus to open when it is necessary for linking an attachment.
-
Initialize linked name/matter: When checked, Abacus will try to look up and populate the linked name and/or matter.
-
Spellcheck entire email: When checked, Outlook will spell check the entire email, not just the part you wrote (for example, headers, reply emails, etc.). This only applies to users of Outlook v2007 and higher.
-
Save attachments when linking an email: When checked, Outlook will automatically save any files attached to the email when the email is linked to Abacus.
-
Select attachments to save: When checked, Outlook will prompt you to select the attachments you want to save.
-
Open Document Details when saving attachments: When checked, Abacus opens (if it is not already open) and opens the Document Details window so that you can fill out all the details for the attachment.
-
Bill emails started in Abacus: When checked, the Time Ticket window will appear and give users the option to bill emails started from AbacusLaw. Users can select not to bill for the email and bypass the Time Ticket window. This option only applies to billable matters.
-
-
Click Done to save your changes.
-
In Outlook 2003 and Outlook 2007 you will not see a difference. However, Outlook 2010 and Outlook 2013 will now have an Abacus tab that has the link buttons.
Enabling Cached Exchange Mode
If you are using an Exchange-based or Office 365 email account in Outlook with the Outlook add-in (or if you are using Abacus Private Cloud and your email account is provided by Abacus), you should enable Cached Exchange Mode. Usually, the add-in malfunctions if a local cache of emails does not exist.
Click here for instructions.
Disabling Email for MS Outlook
-
Select File > Setup > User Preferences. The User Preferences window appears. Select the Printing/Email tab.
-
Under Email Program, select MS Outlook.
-
Click Setup. The Outlook Add-in Setup window appears.
-
Uncheck Enable Outlook Add-in.