Creating PALS
-
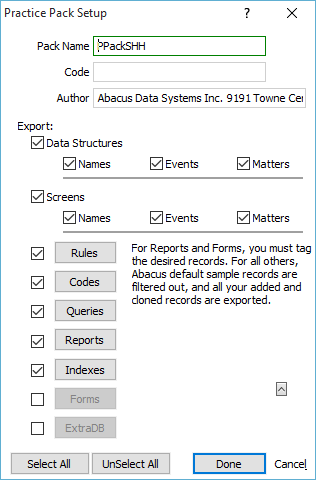
From the main menu, select File > Setup > Practice Packs > Create. The Practice Pack Setup window appears.
-
For Pack Name, enter the name of the Practice Area Legal Solution (PALS). Note that this also serves as the PALS's file name. PALS files will be saved in a folder with your PALS name under the Practice Pack folder under the current data directory. Your Practice Packs folder is used to store various temporary databases and, ultimately, will contain a text file report outlining the contents of the PALS. The Practice Packs folder will also contain two files with your PALS name as the base file name. The file with extension .PP is the setup file that Abacus maintains to remember your settings so you can edit the PALS later. The file with extension .PPZ is the compressed PALS itself that is delivered to users.
-
For Code, enter the unique PALS code given to you by Abacus when you registered the PALS. Registration provides protection. By registering the PALS, you can ensure that only users who have purchased the PALS will be able to install it. Also, Abacus is able to restrict any copying or exporting of the rules, reports, and screens received from a protected PALS. You can distribute unregistered PALS, but they will not have any of this protection.
-
Under Export, select what you want to be exported (included) in the PALS you are creating:
-
Select Data Structures and one or more types of data structure (Names, Events and/or Matters) to include data structures in the PALS.
-
Select Screens and one or more types of screens (Names, Events and/or Matters) to include screens in the PALS.
-
To export all rules, select Rules. You can click the Rules button to open the Rules window and make any last minute changes to your rules.
-
To export all codes, select Codes. You can click the Codes button to open the Code Types window and make any last minute changes to your codes.
-
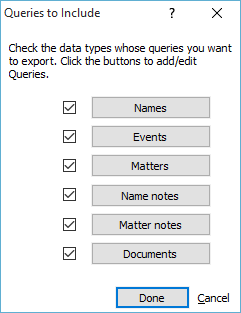
To export selected queries, select Queries and click the Queries button. The Queries to Include window appears. This window lets you select the types of queries you want to include in the PALS you are creating or editing. Select the queries and click Done. Note that you can make last minute changes to queries by clicking the query type button. NOTE: Only custom queries will be exported; Abacus default queries will not be exported to the PALS.
-
To export selected reports, select Reports and click the Reports button. The Report List window appears. Select the reports you want to include in the PALS and click Done.
-
To export user-defined indexes, select Indexes. You can click the Indexes button to open the User-defined Indexes window and make any last minute changes to your user-defined indexes.
-
-
Click Done when you are ready to create the PALS. A text file appears displaying the contents of the PALS.
-
Click Close and the PALS is created.