Setting Up Infusionsoft Sync
Click here for more information about Infusionsoft Sync.
-
Purchase and register the InfusionSoft Sync PALS.
-
Select File > Setup > System Options.
-
The System Options window appears. Select the Features tab and click the Settings button for Infusionsoft Integration.
-
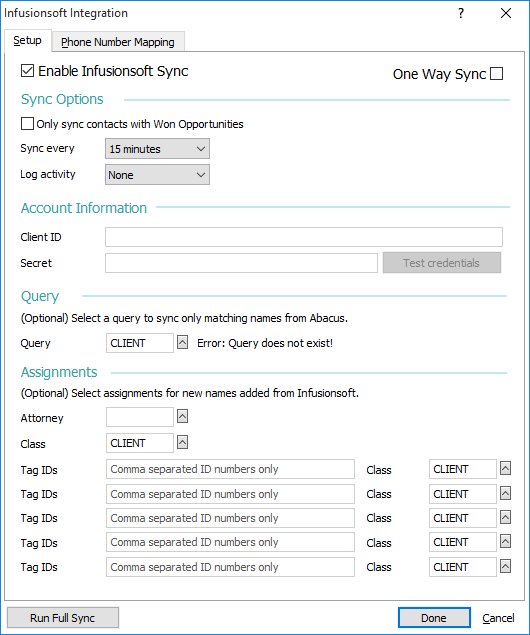
The Infusionsoft Integration window appears. Complete the settings on the Setup tab as follows:
-
Enable Infusionsoft Sync: Check to enable Infusionsoft Sync.
-
One Way Sync: Check to sync only contacts coming in to Abacus from Infusionsoft. This means that changes made in Infusionsoft will be replicated in Abacus, but changes made in Abacus to Infusionsoft names will NOT be replicated in Infusionsoft.
-
Sync Options:
-
Only sync contacts with Won Opportunities: Check if you want to import only contacts with Infusionsoft opportunities with Stage ID set to Won. If you do not check this option, all Infusionsoft contacts will be integrated as Abacus names.
-
Sync every: Select the time interval you want Infusionsoft Sync to perform automatically. Set to 0 (Never) if you only want to perform Infusionsoft Sync manually.
-
Log activity: Select if you want to log Infusionsoft Sync activity (Normal), if you want to log Infusionsoft Sync activity with debug info (With debug info), or if you do not want to log Infusionsoft Sync activity (None). If an Infusionsoft Sync log file is generated, it is saved to Abacus\v23\data01\Sync\Logs\Infusionsoft.
-
-
Account Information: Complete the fields in the section for the Infusionsoft account. Click Test credentials to test your connection to Infusionsoft. In the window that opens, enter your Infusionsoft ID and password and click Log In. If login is successful, Abacus will try to log in to Infusionsoft with the credentials provided and will display a message informing you if the process was successful or not.
-
Query: (optional) When syncing from Abacus to Infusionsoft, only changes to names that were originally integrated from Infusionsoft are made in Infusionsoft. To filter the sync from Abacus to Infusionsoft further, select a query to sync only the integrated Infusionsoft names matching the query.
-
Assignments: (optional) When syncing from Infusionsoft to Abacus, you can select an attorney or class code to be assigned to new names integrated from Infusionsoft.
-
Attorney: Select an attorney code to be assigned to names integrated from Infusionsoft.
-
Class: Select a class code to be assigned to names integrated from Infusionsoft.
-
Tags: Select an Infusionsoft tag ID and then select the class code you want to assign to names with that tag ID.
IMPORTANT NOTES ABOUT TAGS:
(1) If you selected to sync all Infusionsoft contacts and if tags are used, only the contacts with those tags are synced. ALL other contacts are ignored.
(2) If you selected to sync only contacts with Won Opportunities and if tags are used, the Won Opportunity contacts are filtered by the selected tags and only contacts with Won Opportunities and the selected tags are synced.
(2) Class codes configured for tags are assigned to Infusionsoft contacts going into Abacus based on the highest (top) assignment in the list (in case the same tag ID is mistakenly set for two different class codes).
-
-
-
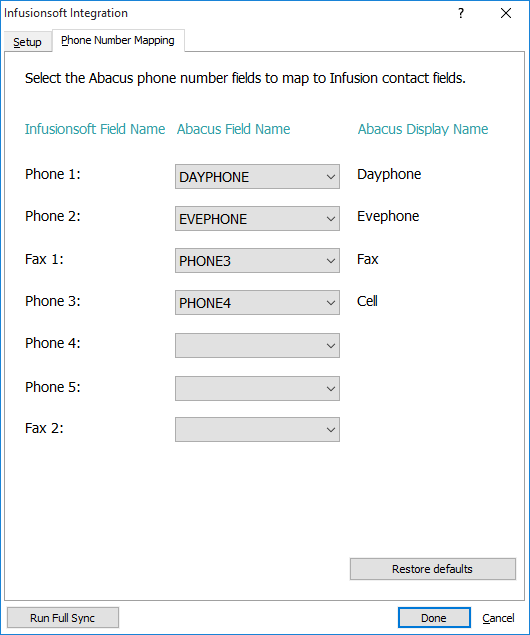
The Phone Number Mapping tab on the Infusionsoft Integration window lets you map where phone numbers for integrated Infusionsoft names are placed in Abacus. Mapped phone numbers will be set appropriately for the phone number fields in Infusionsoft.
-
Click Done to save your changes.