Setting Up Outlook Sync for Local Outlook
Click here for more information about local Outlook Sync.
-
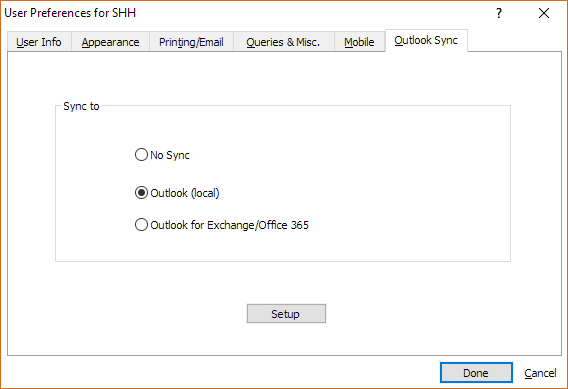
Select File > Setup > User Preferences.
-
The User Preferences window appears. Select the Outlook Sync tab. Select Outlook (local) and click Setup.
-
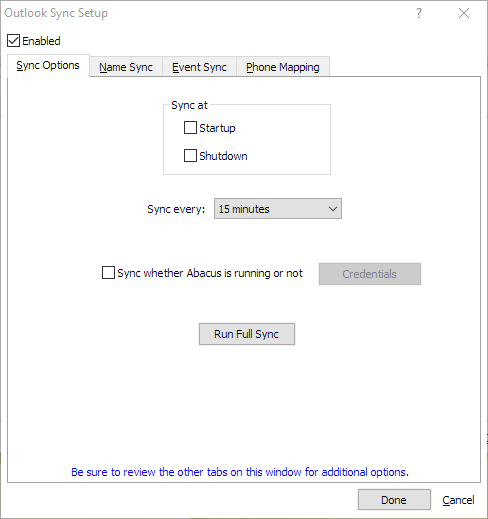
The Outlook Sync Setup window appears with the Sync Options tab selected.
-
Complete the settings on the tab:
-
Sync at: Check Startup to perform an Outlook synchronization every time AbacusLaw is started. Check Shutdown to perform an Outlook synchronization every time AbacusLaw is exited.
-
Sync every: Select the time period between automatic Outlook synchronizations. Select zero (0) if you do not want to automate the Outlook sync process.
-
Sync whether Abacus is running or not: Check to create a Windows scheduled task to Sync Abacus to Outlook. This runs on schedule even when you are logged out. Click Credentials and enter your user name and password.
-
-
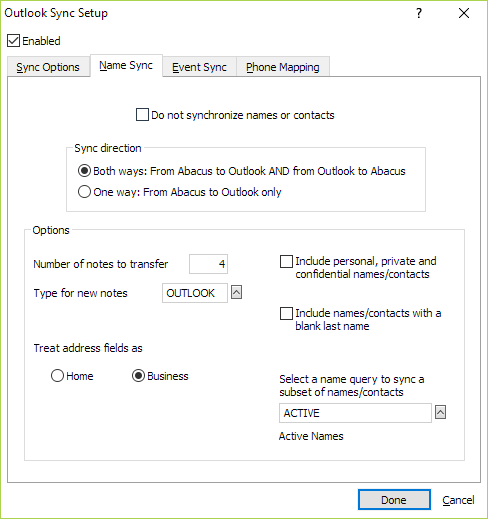
Select the Name Sync tab. This tab controls the synchronization of names and name notes. If you do NOT want to sync names and name notes, check Do not synchronize names or contacts. Otherwise, complete the settings on the tab.
-
Sync direction: Choose the direction of sync information. Send information from Outlook to AbacusLaw AND from AbacusLaw to Outlook or send information only to Outlook from AbacusLaw. NOTE: One-way syncs are safer since one-way syncs cannot propagate bad data to Abacus and duplicates cannot occur.
-
Number of notes to transfer: Enter the number of name notes that will be transferred during the synchronization. The limit is 9.
-
Type for new notes: Select the note type to be automatically assigned to new name notes transferred. With name notes, if existing notes are already synced from AbacusLaw, new notes added to Outlook will not be transferred. New notes, up to the limit, will come in from AbacusLaw however.
-
Include personal, private and confidential names/contacts: Check to include personal, private, and confidential names in the synchronization.
-
Include names/contacts with a blank last name: Check to include contacts with a blank last name.
-
Treat address fields as: Select if the synced address fields are for home or business.
-
Select a name query: Create or select a query to receive just a subset of names. For example, often attorneys limit their phone contacts to just names where they appear on the name as the attorney.
-
-
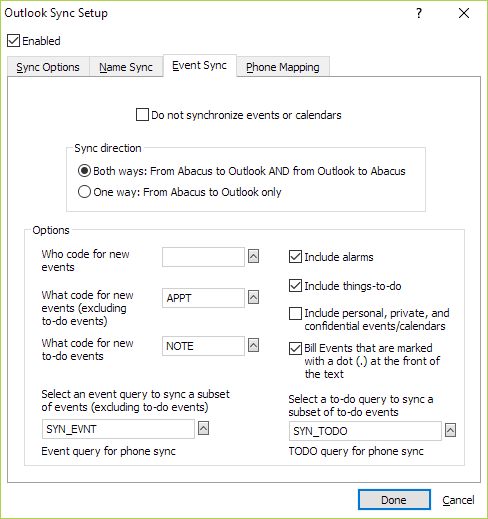
Select the Event Sync tab. This tab controls the synchronization of events. If you do NOT want to sync events, check Do not synchronize events or calendars. Otherwise, complete the settings on the tab.
-
Sync direction: Choose the direction of sync information. Send information from Outlook to AbacusLaw AND from AbacusLaw to Outlook or send information only to Outlook from AbacusLaw. NOTE: One-way syncs are safer since one-way syncs cannot propagate bad data to Abacus and duplicates cannot occur.
-
Who code for new events: Select the WHO code to be assigned to new events and new to-do events entered in Outlook.
-
What code for new events: Select the WHAT code to be assigned to new events entered in Outlook.
-
What code for new to-do events: Select the WHAT code to be assigned to new to-do events entered in Outlook.
-
Include alarms: Check to have alarms that have been set in AbacusLaw also pop up in Outlook.
-
Include things-to-do: Check to sync events in AbacusLaw that have TO-DO entered in the time field.
-
Include personal, private, and confidential events/calendars: Check to include personal, private, and confidential events in the synchronization.
-
Bill Events that are marked with a dot (.) at the front of the text: Check to be able to bill a particular event in Outlook.
-
Select an event query: Create or select a query to limit events (with times) transferred to Outlook. Usually, the SYN_EVNT query is chosen.
-
Select a to-do query: Create or select a query to limit to-do events transferred to Outlook. Usually, the SYN_EVNT query is chosen.
-
-
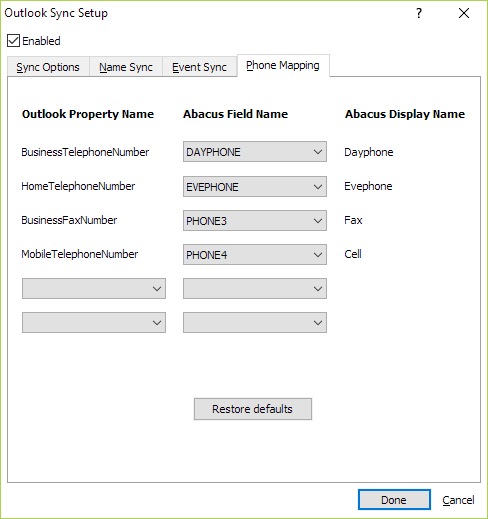
Select the Phone Mapping tab. This tab maps Outlook phone number fields to AbacusLaw phone number fields. For an Outlook phone number field, select a AbacusLaw phone number field to map the fields together. When syncing, these fields will be treated as the same field. For example, if HomeTelephoneNumber is mapped to EVEPHONE, then those two numbers will be the same after syncing.
-
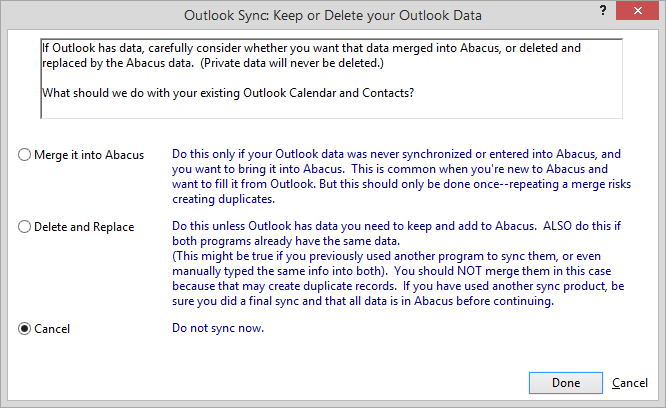
Select the Sync Options tab again and click Run Full Sync. The Outlook Sync window appears. If Outlook has data, select whether you want that data merged into Abacus or deleted and replaced by the Abacus data. NOTE: Private data will never be deleted. Click Done to sync.
-
Click Done to save your changes.