Overview of Screens
User-defined screens define the layout of fields on the data entry windows (Name, Event and Matter windows). When applied to a data entry window, screens alter the appearance of the window. Using screens, you can change the type of information captured through fields on the data entry windows. You can display any of the standard fields, you can mix in any of your own user-defined fields or you can even ignore Abacus fields and only show your user fields. Also, using screens, you can add tabs to the data entry windows for more window space as well as for categorizing fields.
With the Smart Screens feature, Abacus recognizes the type of name or matter being displayed and uses an appropriate screen to show it.
Each screen represents one tab (also called a page) that can appear on the data window. Multiple screens with the same Screen ID will appear as additional tabs to the right of the "linked" tabs on the data window. For example, if you create a screen called MYSCREEN for names, the Name window will use it for the first "Standard" tab. If you add another screen called MYSCREEN, it will appear as another tab on the Name window after the "linked" tabs.
Page numbers are only used to order the screen pages. For example, page 3 will appear after (to the right of) Page 2.
Understanding which screen is being used for a window
To understand which screen is being used for a window, click Windows > Screens. The screen being used is displayed in the lower left-hand corner of the window.
Directly assigning a screen to a record
You can assign a record directly to a screen, regardless of type. To do this, with the name or matter record open, select Window > Screens > Select a Screen. Highlight the screen you want to assign and click Done.
Unassigning a screen for a record
If the current record has been directly assigned to a screen, you can unassign it by selecting Windows > Screens > Un-Assign screen for this record. (This menu option is only enabled if the record is directly assigned to a screen.)
Screens maintenance
Screen maintenance is performed from the Screens window. You can open the window in one of two ways:
-
Select File > Setup > User-defined Screens and select the type of screen you want to work with (Name, Event or Matter).
-
Select File > Setup > User Preferences. The User Preferences window appears. Select the Appearance tab. Under Screens, click the button for the type of data entry screens you want to manage (Name, Event, or Matter).
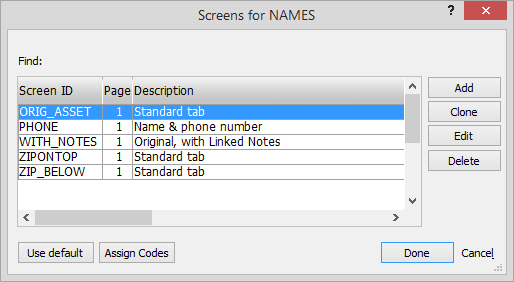
From this window you can do any of the following.
-
To add a screen, click Add. The Screen Designer appears. Create the screen and click Done to save.
-
To clone a screen, highlight the screen you want to clone and click Clone. The Screen Designer appears. Edit the screen from the Screen Designer. Be sure to enter a new screen ID. This is the new file name, and it must be different from the original. Click Done to save.
-
To edit a screen, highlight the screen you want to edit and click Edit. The Screen Designer appears. Edit the screen and click Done to save. NOTE: Do not edit the screen "Original" because this screen name is reserved and any changes to it may be overwritten by future updates to Abacus.
-
To delete a screen, highlight the screen you want to delete and click Delete. A window appears asking you if you are sure you want to delete the screen. Click Yes.
-
To restore a screen to its default state, highlight the screen you want to restore to default (the state of the screen when you first installed the product). Click Use Default. A window appears asking you if you want to restore the default for the selected screen. Click Yes.