Quick Form Editor
When adding, cloning, or editing Quick Forms, the Quick Form Editor window appears.
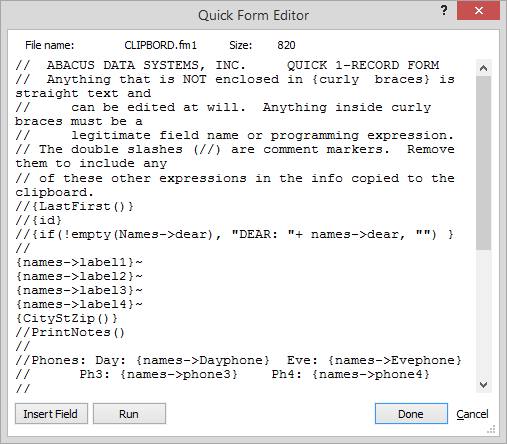
This window displays the formatting and fields for an individual Quick Form. This is where you can control "what prints where."
To change Quick Form contents
Create/edit the Quick Form just as you would a text document. Quick Forms can contains simple text and fields/expressions:
-
For simple text, enter text where you want it to appear. There is no font formatting available as Quick Forms are dependent on using a fixed pitch font for accurate placement. Use blank lines for vertical spacing and spaces for horizontal placement.
-
For fields or expressions, enter any field or other expression inside curly braces {}. Expressions can reference any field or function. For example: {Names->Label1}. Click here for more information about expressions.
To insert a field
If you do not want to enter fields manually, you can use the Insert Field button on the Quick Form Editor. Position the cursor in the Quick Form where you want to insert the field and click Insert Field. The Fields window appears. Highlight the field and click Done.
To see a sample of the Quick Form
One of the best ways to learn about a Quick Form is to run a sample and then compare the sample to the Quick Form as it appears in the Quick Form Editor. With the Quick Form open in the Quick Form Editor, click Run. The Print window appears. Select how you want to print the sample and click Print. The output will show you what the Quick Form will look like with selected data inserted.
Special Features
Following are some special features you can use in your Quick Forms.
|
Special Feature |
Description |
|
Tilde (~) |
Put a tilde (~) at the end of the line to close-in (remove) blank lines if the data is empty. For example: {Names->Label1}~ |
|
{LANDSCAPE} |
Makes the page print sideways. |
|
{FIRMNAME} |
Shows your registered firm name. |
|
{EJECT} |
Starts a new page at a specific place. |
|
{PAPERSIZE 20} |
Makes the printer use COM10 envelopes. |
|
{MARGIN} |
Sets a left margin for the entire printout. Enter a space and the margin size after the command. For example: {MARGIN 10} |
|
{EMAIL ATTACHMENT} |
Use to attach documents. Enter a space and the document path and file name after the command. For example: {EMAIL ATTACHMENT c:\myfile.xyz } To attach multiple documents, use the pipe symbol (|) in between document paths/names. For example: {EMAIL ATTACHMENT c:\ads_err.dbf|C:\Program Files\Dynazip02\Docs\common\dynazip.hlp} |
|
{FONT} |
Use to set the font for the entire form. This feature is only used in Envelope.FM1. Enter a colon and the font name after the command. For example: {FONT:Times New Roman } NOTE: If you use a proportional font instead of Courier, horizontal spacing is unpredictable. If you are trying to display columns of data in the form where a second or third column is supposed to have items line up with the line above or below, you must use the default Courier font. But forms like envelopes where only the left edge needs to line up work great with Times New Roman or Arial. |
|
{FONTSIZE} |
Use to set the font size for the entire form. Enter a colon and the font size after the command. For example: {FONTSIZE:12} |
|
{EMAIlSUBJECT} |
Use to add a subject line to emails. |
|
PrintNotes |
Controls notes printing. PrintNotes has four parameters. For example, PrintNotes(35, 5, 50, T)
IMPORTANT: This command does not use curly braces ({ }). |
|
{OPE} |
Inserts the operator code of the logged in user. |
|
{BOLD} |
Bolds the text after the command. |
|
{ITALIC} |
Italicizes the text after the command. |
|
{PICTURE} |
The {PICTURE} command can be used in two different ways:
|