Adding/Editing a Calendar Report Template
When you add or edit a Calendar report template, the Laser Calendar Design window appears.
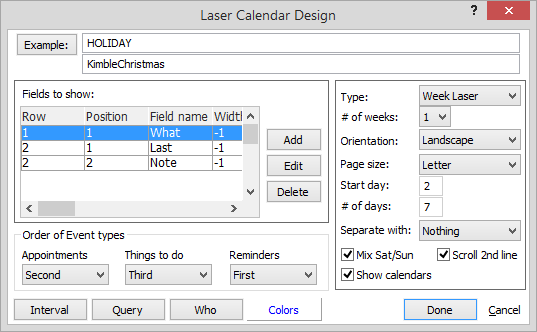
Make changes to the settings on the window and click Done to save your changes.
The following describes the settings on the window.
Example
To select the example record for the report, click the Example button. The Events Browse window appears. Highlight the record you want to use as an example record for the report and click Select.
Fields to Show
Under Fields to show, you can add, edit and delete the fields you want to see displayed on the Calendar report template.
To add fields:
-
Under Fields to show, click Add.
-
The Enter a Value window appears. Enter/edit the line to which you want to add the field and click Done.
-
The Select Fields for Calendar window appears. Check the field or fields you want to see on the calendar and click Done.
To edit fields:
-
Under Fields to show, highlight the field you want to edit and click Edit. The Field Setup window appears.
-
Make changes as necessary. Click here for help understanding the settings on the window.
-
Click Done to save your changes.
To delete fields:
Under Fields to show,highlight the field you want to delete and click Delete. A window appears asking you if you are sure you want to delete the field. Click Yes.
Order of Event types
Set the order for event types as you want them to appear on the laser calendar. Note that you can also select Never from the drop-down options so that the event type does not show on the laser calendar.
General display options
-
Type: Select the type of laser calendar.
-
# of weeks: For weekly calendars only. Select 1-6 where 1 week will provide room for the tallest boxes, and therefore, will show more events per day.
-
Orientation: Select Portrait (vertical) or Landscape (horizontal) page orientation.
-
Page size: Select Letter (8.5" x 11") or Legal (9.5" x 14") for page size.
-
Start day: For the report's start day, enter 1 for Sunday, 2 for Monday, and so on.
-
# of days: Enter the number of days out of the week you want displayed in the report. For example, enter 5 for 5 out of 7 days or just enter 1 to only see one day of the week.
-
Separate with: Select what you want to use to separate events. Note that if you select Blank Line, a window will open asking you for the number of blank lines to use.
-
Mix Sat/Sun: Check if you want both days in one column. Note that Start Day cannot be Saturday (7) for this to work.
-
Show calendars: Check if you want to see small calendars at the bottom of a calendar. Note that if you need more room on a page, you should deselect this option.
-
Scroll 2nd line: Check if you want the fields selected for line 2 to wrap around to multiple lines (up to 20). Note that this is usually impractical for monthly calendars, but can be used with weekly calendars.
Query
If you want to set a query for the Calendar report template, click Query. The Query Manager appears. Highlight the query you want to use and click Done.
Who
If you want to select a particular Who code for the Calendar report template, click Who. The "Who" Setup for Calendars window appears. Select the Who code and click Done.
Colors
To change Calendar report template colors:
-
Click Colors. The Laser Calendar Color Setup window appears.
-
Make changes as necessary. Click here for help understanding the settings on the window.
-
Click Done to save your changes.