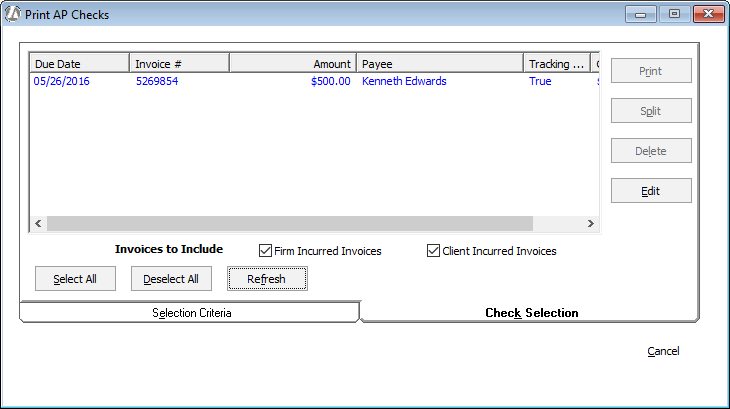
Select A/P > Print A/P Checks. Set your criteria on the Selection Criteria tab as necessary.
Select
the Check
Selection tab.
From the list on the Check Selection
tab, highlight the checks you want to print. If you want to highlight
more than one check, press and hold the CTRL key while you highlight
checks. When they are all selected, click Print.
NOTE: The Tracking Client Payments
field indicates if Track Client payments
was checked when adding the
payable. The Client Payments
field lists the amount the client paid against the payable.

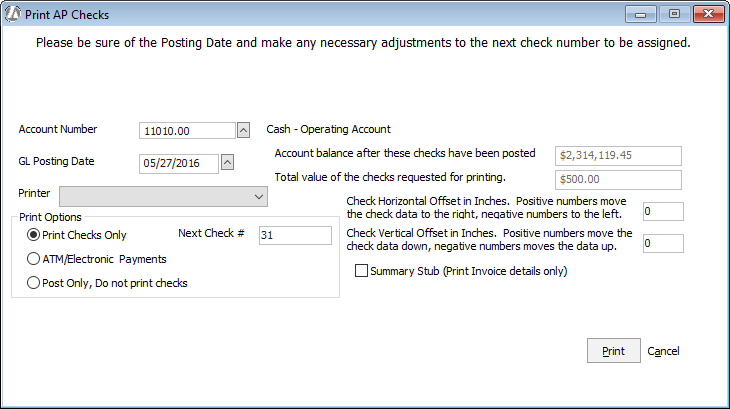
The Print AP Checks window appears.

Complete the window as follows:
Account Number: Select the account the check will be written against.
GL Posting Date: The date that will appear on the check and the posting date. Change as necessary.
Account balance after these checks have been posted: The balance of the selected account minus the total amount of the selected checks.
Total value of the checks requested for printing: The total amount of all the selected checks selected for printing.
Printer: Select the printer if you want to print checks.
Print Options: Select one of the following:
Print Checks Only: Select this option to print the checks only. Abacus Accounting will update the matter activity ledger and check register. If you select this option, the Next Check # field appears displaying the check number to be assigned to the check you are currently printing/posting. Change the check number as necessary.
ATM/Electronic Payments: Select this option if the transaction is for an ATM or electronic payment. Abacus Accounting will update the matter activity and the checkbook, but will not print a check. If you select this option, the Next ATM # field appears displaying the ATM transaction number to be assigned to the transaction you are currently posting. The ATM transaction number is automatically assigned by the system – you cannot change it.
Post Only, Do not print checks: Select this option if you do not want to print the check. Abacus Accounting will update the matter activity and the checkbook, but will not print a check.Next Check Number: The check number to be assigned to the check you are currently printing/posting. NOTE: If you are recording a transaction that does not include a check number (like a debit card transaction), see Processing Debit Transactions for Multiple Expense Accounts. Click here for information about check numbering behavior.
Check Horizontal Offset, Check Vertical Offset: If you want to adjust the offset for printing checks, enter the offset values in these boxes.
Click OK.