Select File > Setup > Chart of Accounts. The Chart of Accounts Browse window appears.
Do one of the following to open the Chart of Accounts Maintenance window:
To add an account, click Add.
To edit an account, highlight the account and click Edit.
Complete/edit the settings on the General Information tab as follows:
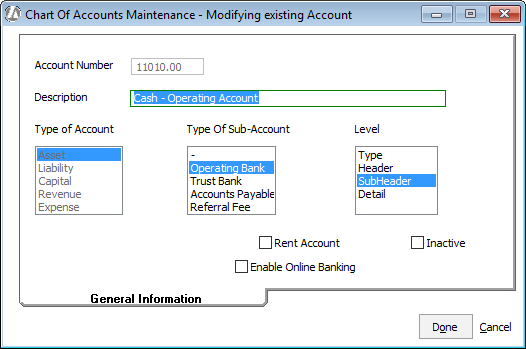
Account Number: Enter 7 digits to uniquely identify the account (for example, 52020.00). Enter the number using the format thhss.dd, where:
t = a type account – 1 = asset accounts; 2 = liability accounts; and 3 = capital accounts; 4 = revenue accounts; and 5-9 = expense accounts
hh = a header account – use 2 digits
ss = a sub-header account – use 2 digits
dd = a detailed account – use 2-digits and remember to enter a decimal point before the detailed account numbers.Description: Enter up to 35 alphanumeric characters to describe the account. This description is printed on reports.
Type of Account: Highlight the type of account.
Type Of Sub-Account: Highlight the type of sub-account.
Level: Select the level of the account. Abacus Accounting includes the following levels of accounts:
Type accounts: The format tool for financial statements. There are nine categories of type accounts:
10000.00 = asset accounts
20000.00 = liability accounts
30000.00 = capital accounts
40000.00 = revenue accounts
50000.00 – 90000.00 = expense accountsHeader accounts: The format tool for financial statements. You can have multiple header accounts for each type account. You cannot post activity to header accounts.
Subheader accounts: “Working” accounts into which activity is directly posted (if NO detail accounts exist for the subheader account). Examples of subheader accounts include rent expense, office expense, or car expense. You can post activity to subheader accounts if no detail accounts exist for the subheader account.
Detail accounts: “Working” account that further details a subheader account. The balance of the detail accounts are rolled into the relating subheader account on the Balance Sheet and Income Statement, but are listed individually on the Trial Balance. Examples of detail accounts include car expense for attorney A, car expense for attorney B, car expense for attorney C, etc.
Specialized Income Statement Account: [only available for revenue and expense accounts and only available when adding an account] Check if you want this account to be considered a specialized income statement account. When generating the Income Statement, you have the option of selecting Include only the Specialized Income Statement Accounts. When this option is selected, the report will only include specialized income statement accounts.
Rent Account: Check if you want the account to be a rent account. Payments to rent accounts are calculated as rent income on 1099s.
Inactive: Check if you want the account to be inactive. Abacus Accounting will NOT post to an inactive account.
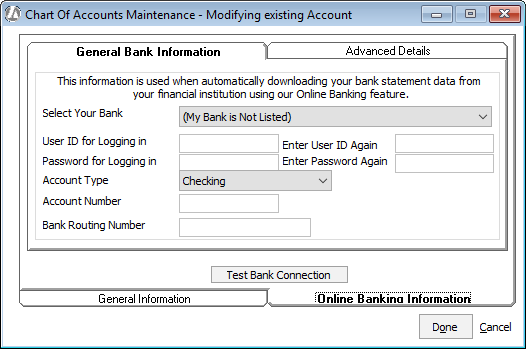
Enable Online Banking: Check if you want this account to have an online connection with your bank so that you can download bank statements directly into Abacus Accounting. This online connection is used when reconciling your accounts. When you check this option, the Online Banking Information tab appears. NOTE: If you are not the Administrator, you will only have access to this tab if you have been granted access to online banking for the user profile. You do this by editing the user profile in AbacusLaw and checking Online Banking in the Utilities > Multiples menu section.
If you checked
Enable Online
Banking, you need to complete the Online
Banking Information tab to create a direct connection to your
bank. Complete all the information for your account. Note that user
ID and password are for your online banking account – not for Abacus
Accounting.
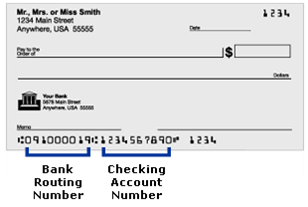
You can find your bank routing number and account number on your checks:
If your bank was listed, then the Advanced
Details tab is completed for you by Abacus Accounting. If your
bank is not one of the available banks listed, then you may need to
contact them for help in completing the settings on the Advanced Details tab.
Click Test Bank Connection to confirm that you have an online connection with your bank through Abacus Accounting.
Click Done to save your changes.