Select File > Setup > Vendors. The Vendors Browse window appears.
Click Add.
AbacusLaw opens where you can add the vendor as a name. After you click Save, a window appears asking you if you want to establish this name as a vendor for accounting purposes. Click Yes.
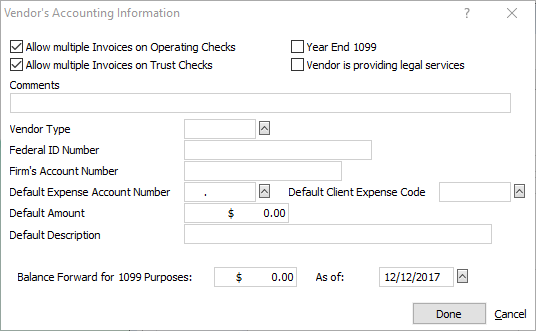
The Vendor’s Accounting Information window appears.

Complete the settings on the window as follows:
Allow multiple Invoices on Operating Checks: Check to combine payments for multiple invoices from this vendor on the same check.
Allow multiple Invoices on Trust Checks: Check to combine payments for multiple invoices from this vendor on the same trust check.
Year End 1099: Check if you need to generate a Form 1099 for this vendor at the end of the year.
Vendor is providing legal services: Check if the vendor is providing legal services. This changes how vendor payments are categorized on the 1099 report (1099 Legal Fees instead of 1099 non-Employee Compensation).
Comments: Enter up to 40 alphabetic characters. This is for informational purposes only; it will NOT appear on the vendor’s checks.
Vendor Type: Select the vendor type.
Federal ID Number: Enter the vendor’s federal ID number or social security number. This is used for 1099s.
Firm’s Account Number: Enter up to 20 alphanumeric characters to identify the account number assigned to your firm by this vendor. This account number will be printed on the vendor’s check stubs.
Default Expense Account Number: Select the general ledger expense account number to which incurred expenses from this vendor are to be posted.
Default Client Expense Code: Select the client expense code most likely to be associated with expenses from this vendor.
Default Amount: Enter the default amount that you want on the vendor’s checks.
Default Description: Enter the default description you want to appear on the vendor’s checks and your general ledger.
Balance Forward for 1099 Purposes: Enter the amount of the balance forward for this vendor for 1099 purposes. This field will be used when 1099s are generated. The amount in this field will be added to the amount of invoices actually paid in the year the 1099 is generated for.
As of: The date to begin the balance forward.
Click Done to save your changes.