Select Trust > Print Trust Checks. The Print Trust Checks window appears.
From the Selection
Criteria tab, you can set criteria for the trust checks you
want to print. (If you want to print all requested trust checks, go
to the next step.) Set your print criteria as necessary. Under Sort Options, select the order in which
you want the checks printed.
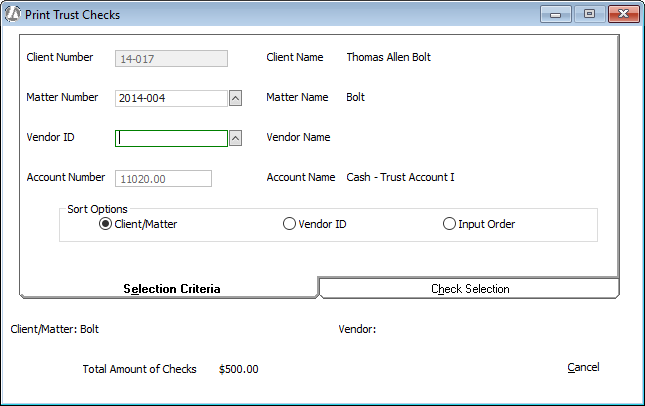
Select the Check
Selection tab. Requested trust checks meeting the criteria
set on the Selection Criteria tab
are listed. (If you did not set any criteria, all requested trust
checks are listed.)

Highlight the check you want to print
and click Print. The following window
appears:

Complete the window as follows:
Check/Post Date: The date that will appear on the check and/or the posting date. Change as necessary.
Total of the Checks Requested for Printing: The total amount of the checks selected for printing. This value is read-only and cannot be changed.
Printer: Select the printer if you want to print checks.
Print Options: Select one of the following:
Print Checks Only: Select this option to print the checks. Abacus Accounting will update the matter trust activity ledger and the trust check register. If you select this option, the Next Check # field appears displaying the check number to be assigned to the check you are currently printing/posting. Change the check number as necessary.
ATM/Electronic Payments: Select this option if the transaction is for an ATM or electronic payment. Abacus Accounting will update the matter trust activity and the trust checkbook, but will not print a check. If you select this option, the Next ATM # field appears displaying the ATM transaction number to be assigned to the transaction you are currently posting. You cannot change this number. It is automatically assigned by the system.
Post Only, Do not print checks: Select this option if you do not want to print the check. Abacus Accounting will update the matter trust activity and the trust checkbook, but will not print a check.Check Horizontal Offset, Check Vertical Offset: If you want to adjust the offset for printing checks, enter the offset values in these boxes.
Summary Stub if more than 10 matters on a check: When this option is NOT checked, the total amount for all matters will be included in the first check printed, but only 10 matters will be included in the summary stub on that first check. If there are more than 10 matters involved, then voided checks with those matters will be printed so that they are all included on the summary stub. 10 matters are included on each check.
When this option IS checked, the total amount for all matters will be included in one check and printed. No summary information will be included.
NOTE: You can get detail information related to the check on the Cash Disbursements Detail report.Show Client's Name on Check: Check to display the client's name on the trust check, or remove the check if you do not want the client's name to appear on the trust check. NOTE: This setting can be changed for all trust checks (as a default) through Company Preferences.
Click OK and the check is printed and/or posted to the matter trust activity.