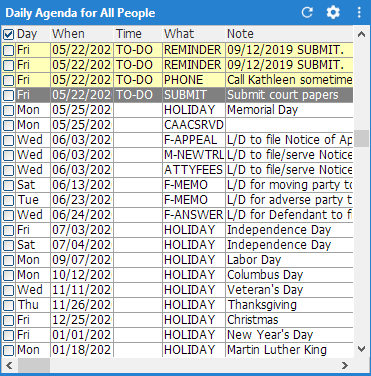
Daily Agenda App
The Daily Agenda app on the Dashboard conveniently displays upcoming calendar events. Scroll in the app to see all events.
To edit settings for the app
-
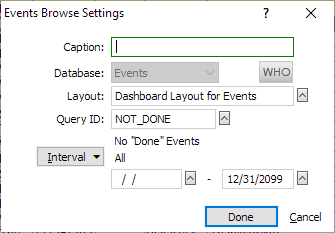
Click the app’s Settings button. The Events Browse Settings window appears.
-
For Caption, enter the title to appear in the app's title bar. Leave this field blank to use the default title.
-
Database is set to the Events database and cannot be changed.
-
To determine whose events to view in the app, click WHO. The "Who" Setup for Calendars window appears. Click the Who Codes to view lookup button and select the WHO code for the Daily Agenda app and click Done. If you need more help with this window, click the help button on the window or press F1.
-
Click the lookup button for Layout. The Report List window appears. Check the layout you want to use for the app and click Done.
-
If you want to use a query to filter the calendar events in the Daily Agenda app, click the Query ID look up button. The Query Manager appears. Highlight a query and click Done. If you need more help with this window, click the help button on the window or press F1.
NOTE: When you change the query, the setting is not saved. The selected query is only used for the Daily Agenda app for the current session. To change the query permanently, edit the query in the selected layout as follows:-
Click the lookup button for Layout.
-
The Report List window appears. Highlight the layout and click Edit.
-
The Edit Report window appears. Click Query.
-
The Queries window appears. Check the query you want to save for the layout and click Done.
-
-
To set a time period for the events listed in the Daily Agenda app, click Interval. A menu appears. Click the type of date interval you want to use for the app. Note that if you select Date Range, you can enter a custom date range using the fields provided under the Interval button.
-
Click Done to save your changes and close the window.
To use the right-click menu
The following describes how to use the right-click menu options for the Daily Agenda app.
|
Right-Click Menu Option |
How to Use |
|
Add a new Event |
Click to open the New Event window where you can create a new event. For help, click the help button on the window or press F1. |
|
Clone this record |
Right-click the event you want to copy and click Clone this record. The Edit Event window appears where you can make a save-as copy of the selected event. |
|
Add Events from a Rule |
Click to add an event from a rule. When you select this menu option, the Rules window appears. For help, click the help button on the window or press F1. |
|
Reschedule |
Right-click the event you want to reschedule and click Reschedule. A calendar appears. Select the new date. |
|
Delete |
Right-click the event you want to delete and click Delete. A window appears asking you if you are sure you want to delete. Click Yes. |
|
Mark Done |
Right-click the event you want to mark as done and click Mark Done. The Mark Events Done window appears. For help, click the help button on the window or press F1. |
|
Priority |
Right-click the event you want to prioritize and click Priority. Then, click the priority level you want to assign the event. |
|
Recur |
Right-click the event you want to recur and click Recur. The Recur Events window appears. For help, click the help button on the window or press F1. |
|
Send |
Right-click the event you want to send and click Send. Then, click Email or Instant Message depending on how you want to send the information. If you select Email the Send Event window appears. For help, click the help button on the window or press F1. If you select Instant Message, the message is started in MessageSlips. |
|
Linked Events |
To view linked events for an event, right-click the event and click Linked Events. If there are any linked events they will be listed. |
|
View linked Matter |
Right-click an event and click View linked Matter to view the matter linked to the event in the Matter window. |
|
View linked Name |
Right-click an event and click View linked Name to view the name linked to the event in the Name window. |
|
Print memo |
Right-click the event for which you want to print a memo and click Print memo. The Print window appears. Change the settings as necessary and click Print. |
|
Bill |
Right-click the event you want to bill and click Bill. The Send to Accounting window appears. For help, click the help button on the window or press F1. |
|
Form generation |
Right-click the event for which you want to assign or generate a form and click Assign a form or Do the form. If you click Assign a form, the Assign a Form window appears. For help, click the help button on the window or press F1. If you click Do the form, the form appears. NOTE: You cannot generate a document for the event unless a form is assigned. |
|
Calendar Setup |
Click to open the Calendar Setup window. For help, click the help button on the window or press F1. |
|
Tagged Events |
Use this option to tag (or check) events in the list. Select the option and then click:
|