Favorite & Recent Apps
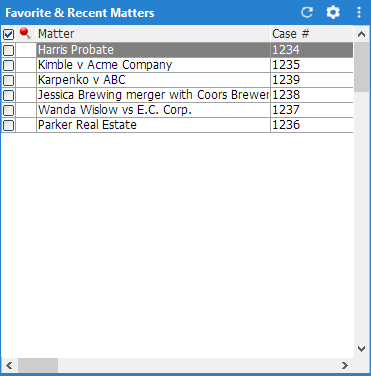
The Favorite & Recent Names, Favorite & Recent Events, and Favorite & Recent Matters apps on the Dashboard list your most recently accessed name, event, or matter records. You can mark these records as favorites in the app.
The following describes the tasks you can perform from this app.
To change the content and layout of the list
-
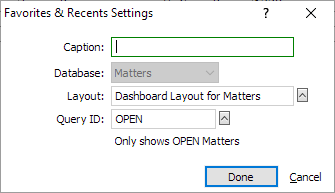
Click the app’s Settings button. The Favorites & Recents Settings window appears.
-
For Caption, enter the title to appear in the app's title bar. Leave this field blank to use the default title.
-
Database is set to the Names, Events or Matters database and cannot be changed.
-
Click the lookup button for Layout. The Report List window appears. Check the layout you want to use for the list and click Done.
-
If you want to use a query to filter the list, click the Query ID lookup button. The Query Manager appears. Check the query you want to use and click Done.
-
Click Done to save your changes.
To mark a name, event or matter as a favorite
Click the cell in the Pin column to mark the record with a pin ( ). When you pin a record, it moves to the top of the list as a favorite.
Click the pin to remove it.
Drag favorites up or down in the list to sort them in your preferred order.
To send an email to a name on the list
-
Click the Email button next to the name. The Send Email window appears. Notice that the To field is completed for you based on the name you selected.
-
Complete the window as necessary. For help, click the help button on the Send Email window or press F1.
-
Click Send. An email form appears for your email program. Complete the email as you would normally and send it.
To open a name, event, or matter in Abacus
Double-click the name, event, or matter in the list.
To use the right-click menu
For each list (Names, Events, or Matters), there is a right-click menu available. The menu options change depending on the type of list displayed.
The following describes how to use the right-click menu options for each list.
Right-Click Menu Options for Names List
|
Right-Click Menu Option |
How to Use |
|
Print All fields |
Use this menu option to print names in the list. If you want to print one name, highlight the name. If you want to print multiple names, check them. Right-click and click Print All fields. Then, select This Name only if you want to print the highlighted name. Or, select All to print all the checked names. The Print window appears. Change the settings as necessary and click Print. |
|
Copy to Clipboard |
Click to copy the name record data to the Windows clipboard. |
|
Reports |
Use this menu option to run reports for names. If you want to run a report for one name, highlight the name. If you want to run a report for multiple names, check them. Right-click and click Reports. Then, select This Name only if you want to run a report for the highlighted name. Or, select All to run a report for all the checked names. The Names Report Control window appears. For help, click the help button on the window or press F1. |
|
Send Email |
|
|
Label |
Check the records for which you want to print a label and click the menu option. The Label Printing window appears. For help, click the help button on the window or press F1. |
|
Envelope |
Use this menu option to print envelopes for names in the list. If you want to print an envelope for one name, highlight the name. If you want to print envelopes for multiple names, check them. Click Envelope and then click one of the following options:
The Print window appears. Change the settings as necessary and click Print. |
|
MailMerge |
Check the records you want to mail merge and click the menu option. The Mail Merge window appears. For help, click the help button on the window or press F1. |
|
Link all tagged to Matter |
Check the names you want to link to a matter, then click the menu option. The Matters Browse window appears. Highlight the matter and click Select. |
|
Promote Prospect |
Click to promote the selected name to a client, which means the name record is moved to the main Abacus database. |
|
Tagged Names |
Use this option to tag (or check) names in the list. Select the option and then click:
|
|
Names Browse |
Click to open the Names Browse window. |
Right-Click Menu Options for Events List
|
Right-Click Menu Option |
How to Use |
|
Add a new Event |
Click to open the New Event window where you can create a new event. For help, click the help button on the window or press F1. |
|
Clone this record |
Right-click the event you want to copy and click Clone this record. The Edit Event window appears where you can make a save-as copy of the selected event. |
|
Add Events from a Rule |
Click to add an event from a rule. When you select this menu option, the Rules window appears. For help, click the help button on the window or press F1. |
|
Add Note for Name and Matter |
Right-click the event and click the menu option. The Note Editor window appears with the related name/matter selected. Enter the note and click Done. |
|
Reschedule |
Right-click the event you want to reschedule and click Reschedule. A calendar appears. Select the new date. |
|
Delete |
Right-click the event you want to delete and click Delete. A window appears asking you if you are sure you want to delete. Click Yes. |
|
Mark Done |
Right-click the event you want to mark as done and click Mark Done. The Mark Events Done window appears. For help, click the help button on the window or press F1. |
|
Priority |
Right-click the event you want to prioritize and click Priority. Then, click the priority level you want to assign the event. |
|
Recur |
Right-click the event you want to recur and click Recur. The Recur Events window appears. For help, click the help button on the window or press F1. |
|
Send |
Right-click the event you want to send and click Send. Then, click Email or Instant Message depending on how you want to send the information. If you select Email the Send Event window appears. For help, click the help button on the window or press F1. If you select Instant Message, the message is started in MessageSlips. |
|
Linked Events |
To view linked events for an event, right-click the event and click Linked Events. If there are any linked events they will be listed. |
|
View linked Matter |
Right-click an event and click View linked Matter to view the matter linked to the event in the Matter window. |
|
View linked Name |
Right-click an event and click View linked Name to view the name linked to the event in the Name window. |
|
Print memo |
Right-click the event for which you want to print a memo and click Print memo. The Print window appears. Change the settings as necessary and click Print. |
|
Bill |
Right-click the event you want to bill and click Bill. The Send to Accounting window appears. For help, click the help button on the window or press F1. |
|
Form generation |
Right-click the event for which you want to assign or generate a form and click Assign a form or Do the form. If you click Assign a form, the Assign a Form window appears. For help, click the help button on the window or press F1. If you click Do the form, the form appears. NOTE: You cannot generate a document for the event unless a form is assigned. |
|
Calendar Setup |
Click to open the Calendar Setup window. For help, click the help button on the window or press F1. |
|
Tagged Events |
Use this option to tag (or check) events in the list. Select the option and then click:
|
Right-Click Menu Options for Matters List
|
Right-Click Menu Option |
How to Use |
|
Print All fields |
Use this menu option to print matters in the list. If you want to print one matter, highlight the matter. If you want to print multiple matters, check them. Right-click and click Print All fields. Then, select This Matter only if you want to print the highlighted matter. Or, select All to print all the checked matters. The Print window appears. Change the settings as necessary and click Print. |
|
Copy to Clipboard |
Click to copy the matter record data to the Windows clipboard. |
|
Reports |
Use this menu option to run reports for matters. If you want to run a report for one matter, highlight the matter. If you want to run a report for multiple matters, check them. Right-click and click Reports. Then, select This Matter only if you want to run a report for the highlighted matter. Or, select All to run a report for all the checked matters. The Matters Report Control window appears. For help, click the help button on the window or press F1. |
|
Tagged Matters |
Use this option to tag (or check) matters in the list. Select the option and then click:
|
|
Matters Browse |
Click to open the Matters Browse window. |