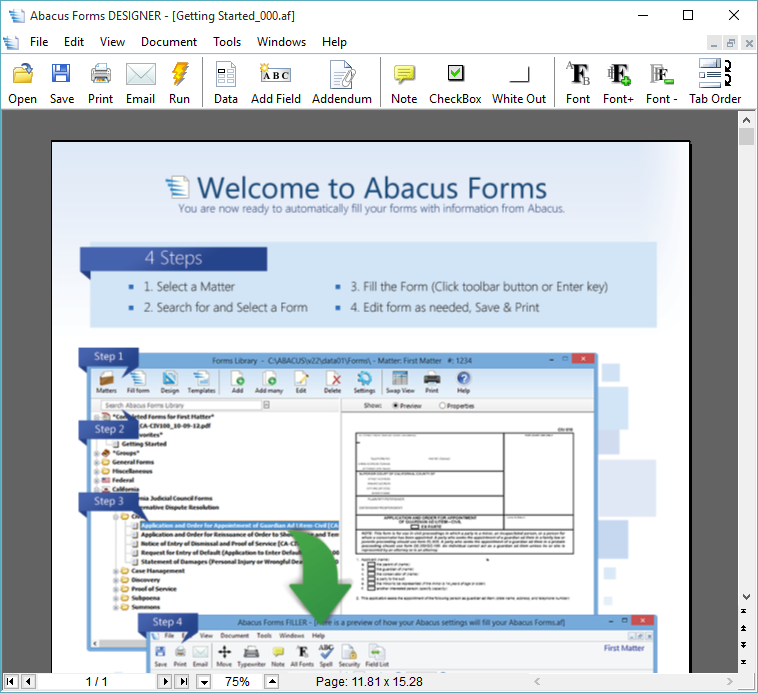
Using the Forms Designer
The Forms Designer is used when creating a PDF fillable form or editing a PDF fillable form.
The Forms Designer, similar to Acrobat™ Professional, creates data-enabled PDF fillable forms from source files. Unlike many forms programs, Abacus is an open system where you can download forms from your courts’ web sites or scan printed forms and add them to your Forms Library. The Designer program connects data to the form fields and checkboxes, and lets you modify forms to meet your needs.
If you purchase fillable forms from Abacus, you’ll probably never need to use the Designer. But if you heavily customize your Abacus databases and screens, you have a tool to integrate your personal design into your fillable forms as well.

From the Forms Designer, you can do any of the following.
To open a different PDF fillable form
Click the Open button on the Forms Designer toolbar (or select File > Open from the Forms Designer menu bar) and a window opens listing forms. Highlight a form and click Open.
To save a PDF fillable form
Click the Save button on the Forms Designer toolbar (or select File > Save from the Forms Designer menu bar).
To save a read-only copy of the PDF fillable form, select File > Save as Final from the Forms Designer menu bar. This prevents any further changes to the database fields since editing is not allowed in the final version.
To print the PDF fillable form
Click the Print button on the Forms Designer toolbar (or select File > Print from the Forms Designer menu bar) and a Print window appears. Change the settings as necessary and click OK.
To email the PDF fillable form
Save the form and then click the Email button on the Forms Designer toolbar (or select File > Email on the Forms Designer menu bar). An email message window appears. The form is added to the email as an attachment. Enter the email address and send the email as usual.
To preview the PDF fillable form
To preview what the filled form looks like to the form user, click the Run button on the Forms Designer toolbar (or select View > Run from the Forms Designer menu bar). To return to design mode, click the Design mode button.
To map data fields to PDF fillable form fields
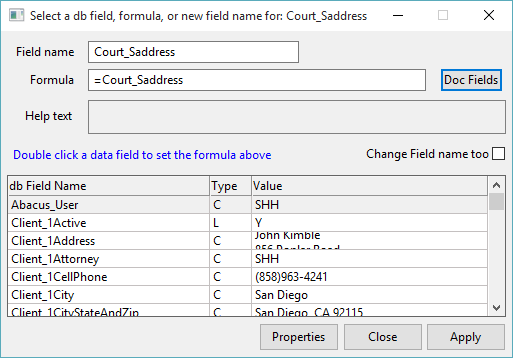
“Mapping” means setting up a particular form field to receive data from a database field. To map data fields to form fields, right-click a form field OR select a form field and then click the Data button on the Forms Designer toolbar (or select Tools > Data from the Forms Designer menu bar). The Select a db field, formula, or new field name window appears. This window lists all the fields in the matter profile (this is why you always use the same matter when designing different forms—all the fields are collected to a common master list so you can avoid creating duplicates). Field values are shown as a convenience for recognizing their usage.

If a field does not have a clear name (some forms just have numbers for field names), you should set it to something useful—usually the same name as the data field you want to fill it. The Formula field is where you map the data. Formulas start with “=” and are usually just the name of a data field from the matter profile, but they can also be a complex expression or calculation.
-
In the list, double-click the data field whose value you want set into the form field. This is what you’ll do 95% of the time. For example, for the Name field on the form, you might want to use the client name field. The Field name and Formula are inserted for you.
-
You can set a fixed value to a field. Simply enter the text without the leading “=”. You can also use this feature for a prompt that you expect the user to overwrite (instead of just seeing a blank field). For example, for the Name field on your form, you might want the user to see the text “Enter your first and last name.” Enter these types of values in the Formula field.
-
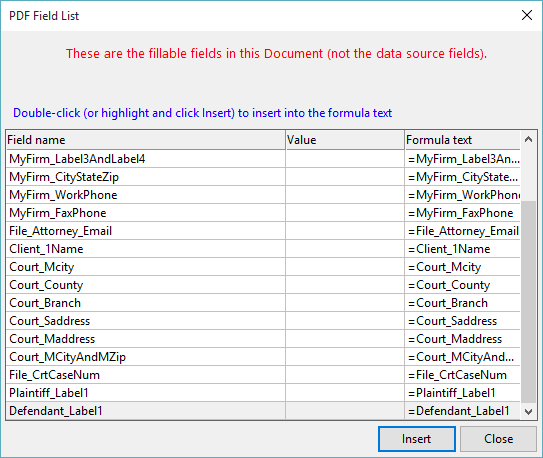
If you want to build certain types of formulas, click Doc Fields. The PDF Field List window appears. listing all the form fields in the PDF form (not in the database). Highlighting a field on this window and clicking Insert appends the field into the formula so you can quickly concatenate several text fields or sum several numeric fields. Note that formulas are usually created from data fields, but sometimes you might want the values that a user enters into the form to be added together, such as totaling a column of numeric fields.

-
To see how the form looks to the user, click Run.
-
Continue to map fields as necessary. Note that you do not need to close the window while you do this. After it is open, just click a different field, make changes, and click Apply.
-
Click Close.
Adding Data Fields to the Profile
Sometimes a form field will not have an equivalent available for you to select from the matter profile. You can create a new field in the profile by entering both a new name and a formula. For example, set the field name to Respondent and the formula to =Respondent. Click Apply and the new field is added to the list.
Using Multiple Field Syntax
When you map more than one Abacus data field to a form field, you need to join them with the proper syntax.
Use:
+ “ ” +
between each mapped field within a form field. The plus signs (+) join two fields and the quotation marks (“ ”) let you insert spaces or alphanumeric characters between fields.
For example, the mapped fields:
=MyFirm_City + “, ” + MyFirm_State + “ “ + MyFirm_Zip
join three fields, MyFirm_City, MyFirm_State, and MyFirm_Zip. There is a comma (,) and a space inserted between the first 2 fields and a space inserted between the second and third fields. So, once you run the form, the value for this mapped field might look like this:
San Diego, CA 92122
To add fields to the PDF fillable form
Your original form may or may not have fields already in it. To add a field to the form, click the Add Field button on the Forms Designer toolbar (or select Tools > Add Field from the Forms Designer menu bar). Then, click and drag to draw a box on the form. Click the empty form field to select it and right-click it to set properties.
To delete fields on the PDF fillable form
Click the field to select it and press the Delete key.
To maintain check boxes on the PDF fillable form
To add a check box: Click the CheckBox button on the toolbar (or select Tools > Add CheckBox from the Forms Designer menu bar). Then, draw a box on the form.
To delete a check box: Click the check box to select it and press the Delete key.
To maintain comments on the PDF fillable form
Comments are like electronic sticky notes that you place on the form. They do not print with the form. Rather, they are for internal or user purposes only.
To add a comment, click the Note button. Draw a box on the form where you want to put the note. Enter your comment in the note box.
To delete a comment, click the comment box to select it, and press the Delete key.
To hide parts of the PDF fillable form
The White Out button on the Forms Designer toolbar hides parts of the form behind a white box. To use, click the button, then click and drag on the form to add a white box. Any content behind the white box will not be displayed when viewing the form on the screen or when printing the form.
To change font style for PDF fillable form fields
Do one of the following:
-
If you want to change font style for ALL fields on the form, do NOT select any fields.
-
If you want to change the font style for selected fields only, select one or more fields. To select multiple fields, hold the Control key while clicking the additional fields. To de-select all fields click the cursor in an open space on the form.
Then, click the Font button on the Forms Designer toolbar. The Font window appears. Change the settings as necessary and click OK.
To change font size for PDF fillable form fields
Select the field for which you want to change font size. Click the Font+ button on the toolbar to increase the font size for the selected field. Click the Font- button on the toolbar to decrease the font size of the selected field.To change tab order for the PDF fillable form
The Tab Order button on the Forms Designer toolbar enables complete control of the tab order for fields in each page of a form. To use it, click the Tab Order toolbar button, and then click each field in the form in the order you would like the cursor to move between fields when the Tab key is pressed. You must repeat the steps (click the Tab Order button and then click each field on the page) on each page in the form to assign the tab order throughout the document.
To arrange items on the PDF fillable form
Press the CTRL key and select the fields you want to work with. Then, select Tools > Arrange items from the Forms Designer menu bar and select the menu option for the task you want to perform. You can align the selected fields, center them, or make their heights/widths equal.
To view the ruler for the PDF fillable form
To view the ruler, select View > Ruler from the Forms Designer menu bar.
To spell check the PDF fillable form
Select Tools > Spell Check > Current Document from the Forms Designer menu bar.
To set up the PDF fillable form
-
Select File > Setup from the Forms Designer menu bar. The Setup window appears.
-
If you want to use a different font when filling forms, under My font override for all forms, click Select Font. Select the font style to use when filling the form and click OK.
-
Under At Startup, when fields have unresolved Formulas, select whether you want to leave the fields blank or show the formula.
-
Check Save final forms in PDF/A file format if you want Abacus Forms to save filled PDF documents in the PDF/A format.
-
Click OK to save your form setup changes.
To exit the Forms Designer
Select File > Exit from the Forms Designer menu bar.