Document Details Window
The Document Detail window opens when you are adding or editing a document link in Abacus. It lets you add information about a linked document. You can also bill from this window.
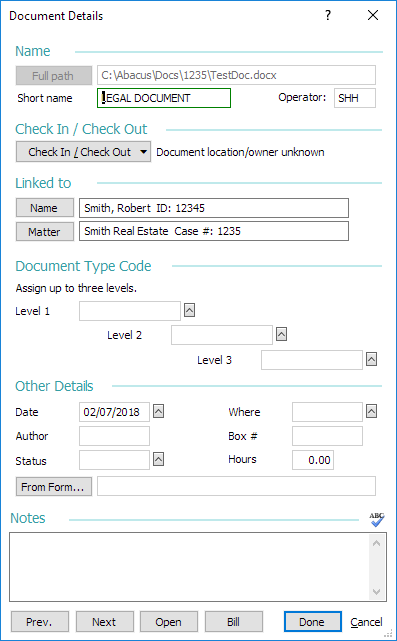
Change the settings on the window and click Done to save your changes.
The following describes the settings on the window:
Name
-
Full path: The directory path for the document (where the document is stored on disk). To change, click the button. The Select a Document window appears. Select the document you want to link and click Open. The Document Details window reappears.
NOTE: You can also enter a folder name (like c:\abacus) or a Web address (like www.abacuslaw.com).
WARNING: Extremely long folder and file names may be problematic. -
Short name: An identifier to help you distinguish the document from others in the database. It can be up to 12 characters.
-
Operator: The operator User ID that added the document.
Check In / Check Out
If you have Enhanced Document Management enabled, use this button to check the document out and in.
Linked to
-
Name: If the document is linked to a name, the name will be listed here. To link a name or change a linked name, click the button. The Names Browse window appears. Highlight a name and click Select.
-
Matter: If the document is linked to a matter, the matter will be listed here. To link a matter or change a linked matter, click the button. The Matters Browse window appears. Highlight a matter and click Select.
Document Type Code
Three levels of document type codes can be assigned to the document. To change, click the lookup button. The Valid Document Type Entries window appears. Highlight a code for document type (or add a code on the fly) and click Done.
Assigned document type codes are used to group and categorize documents on the Name and Matter window's Docs tab for the Folder View. Note that assigning a document type is optional. Documents with no document types assigned will be stored in an Uncategorized Documents folder in the Folder View.
Other Details
-
Date: The document's date. Initialized to today when a document is added, this field can be used to track the date of creation OR another date you prefer to track, such as date sent or received.
-
Where: The code describing where the document is stored. To change, click the lookup button. The Valid Document Location Entries window appears. Highlight the code that describes where the document is stored (or add a code on the fly) and click Done.
-
Author: The name of the person that created the document.
-
Box #: The number of the storage box that holds the document.
-
Status: The code describing the status of the document. To change, click the lookup button. The Valid Document Status Entries window appears. Select a code that reflects the status of the document (or add a code on the fly) and click OK.
-
Hours: If you have Abacus Accounting, use this field to enter the billable hours for the document.
-
From Form: The original form used to generate the document. Useful when you need to back track the history or versions of a document. To change, click the button. The Select a Form window appears. Select the original form that was used to generate the document, and click Open.
Notes
Enter general notes, keywords or even an abstract for the document in the box.