Configuring Staff Notifications
Notifications for staff (AbacusLaw users in the firm) are configured at the firm level and at the individual user level. The Notifications feature must be turned on at the firm level (on the Notification Settings Center window). Once it is turned on, users have the ability to choose how they would like to receive notifications in their individual user settings.
Individual user notifications settings override the firm notifications settings, so notifications can be customized for each staff member.
Configuring Staff Notifications at Firm Level
-
Select File > Setup > System Options.
-
The System Options window appears. Select the Features tab and click the Settings button for Notifications.
-
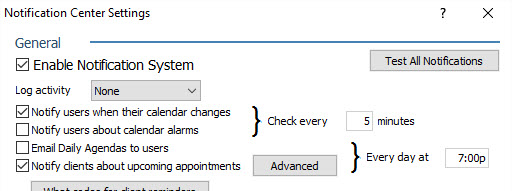
The Notifications Center Settings window appears. Under General, ensure that Enable Notification System is checked.
-
In the General section, configure the settings you would like to implement for all staff:
-
Check Notify users when their calendar changes if you want an AbacusLaw user notified when an event on his or her calendar is added, modified, reassigned to another user, or deleted. Note that users will not be notified about changes to their calendar if the user made the change himself/herself.
-
Check Notify users about calendar alarms for notifications when a calendar alarm is triggered (like for an upcoming appointment).
-
Change Check every to set the time interval Abacus checks for calendar changes and alarms.
-
Check Email Daily Agendas to users to have each user's calendar for the next day emailed to him/her. Enter the designated time in the Every day at box provided.
-
-
Configure the Email settings you would like to implement for staff.
-
Configure the text messaging settings you would like to implement for staff. Note that staff notifications can be sent using the email settings, but a Twilio account will need to be set up and used if client notifications are also being sent.
-
Click Test All Notifications in the General section. This will not send out any notifications; rather, it only tests your settings. If this test is successful, you are set up properly.
-
In the Notification Center Settings window, click Done to save your changes.
Configuring Staff Notifications on the Individual User Level
NOTE: Users can manage their own notification settings by going to File > Setup > User Preferences. On the User Preferences page’s Queries & Misc tab, go to the Notifications section and click Set up Email and SMS Alerts.
NOTE: Users not wanting to receive notifications should not complete this procedure.
-
Select File > Setup > System Options.
-
The System Options window appears. Select the Features tab and click the Settings button for Notifications.
-
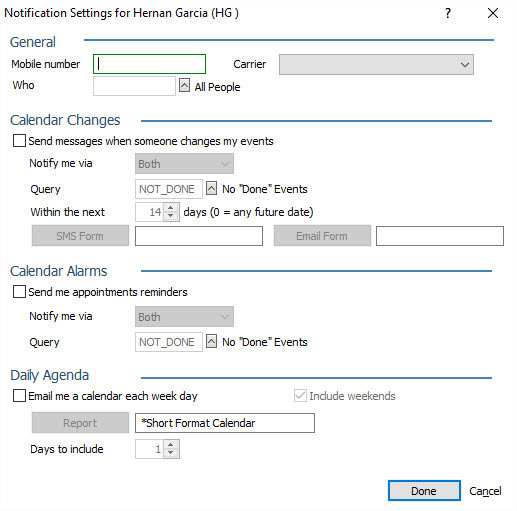
The Notifications Center Settings window appears. Click User Manager.
-
The User Manager window appears. Highlight the user you want to set notifications for and click Notifications. The Notification Settings for [User] window appears. On this window, you configure notification settings for the selected user. Note that these settings will override any notification settings you have selected for the firm (on the Notification Settings window).
-
In the General section, do the following:
-
For Mobile number, enter the selected user's mobile number.
-
For Carrier, select the user's mobile carrier.
-
Click Who to open the “Who” Setup for Notifications window. Check the IDs for the people that the user would like to receive notifications about calendar changes. For example, if you check HG, SHH, and BTB for user HG, HG will receive notifications about calendar changes for himself, SHH, and BTB. To receive notifications for all users listed, check Set to All People.
-
-
In the Calendar Changes section, do the following:
-
Check Send messages when someone changes my events if you want the user to receive notifications when his/her calendar is modified by a different user.
-
For Notify me via, select whether you want the user to receive calendar change notifications by Email, SMS (text), or Both. Note that this field is not active unless Send messages when someone changes my events is checked.
-
For Query, select a query to include or exclude calendar events for the notification. For example, the default query selected (NOT_DONE) excludes any "Done" events from triggering user notifications.
-
For Within the next, set a time frame for how far out to include events. For example, if you select 14 days, notifications will only be sent for changed events happening within the next 14 days. If you want the user to receive calendar change notifications for all events in the future, enter 0 (zero).
-
For SMS Form and Email Form, click the button to select a Quick Form to use for a SMS (text) template or an email template to use for the notifications. Note that Professional Services can create or change these Quick Forms for you if you need customization.
-
-
In the Calendar Alarms section, do the following:
-
Check Send me appointments reminders if you want the user to receive notifications for his/her calendar alarms. Remember that checking this option will override your firm notification settings.
-
For Notify me via, select whether you want the user to receive calendar alarm notifications by Email, SMS (text), or Both. Note that this field is not active unless Send me appointments reminders is checked.
-
For Query, select a query to include or exclude calendar alarms for the notification. For example, the default query selected (NOT_DONE) excludes any calendar alarms for "Done" events from triggering user notifications.
-
-
In the Daily Agenda section, do the following:
-
Check Email me a calendar each week day if you want the user to be sent his/her calendar every week day.
-
Check Include weekends if you want the user to be sent his/her calendar every day, including weekends. Note that this option is not active unless Email me a calendar each week day is checked.
-
Click Report and select the type of format you want for the calendars.
-
For Days to Include, select the number of days out for the calendar. For example, if you select 1 (default), then just tomorrow's daily agenda will be sent. If you select 7, then the calendar for the next 7 days will be sent.
-
-
Click Done to save your changes.