Report Control Window
The Report Control window lets you complete the process of generating a report.
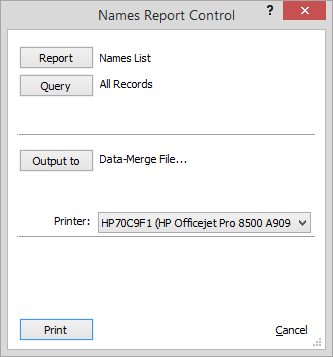
The following describes each setting on the window. Note that the window can have different settings depending on the report being generated.
-
Report: Indicates the report template that will be used. To change, click the button. The Report list window appears displaying report templates. Highlight the report template you want to use and click Done.
-
Query: Indicates the query (if any) that will be used to filter the information to be included in the report. To change, click the button and select Quick query or Query Manager to create or select a query to use. (You can also select Clear current query to remove the currently selected query.) Click here for more information about queries.
-
Interval: [This field only appears when generating reports for events.] Indicates the time period for which you want to limit data. Click the button and select one of the time ranges listed or change the time range manually.
-
Who: [This field only appears when generating reports for events.] Indicates the Who codes for which the report will be generated. To change click the button. The "Who" Setup for Calendars window appears. Complete the window. Click here for help changing the settings on this window.
-
Output to: Indicates the type of output you want to generate (to the printer, screen, file or data-merge file). To change, click the button. The Output to window appears. Highlight your output selection and click Done.
Note that if you select Data-Merge File, the Merge File window appears. Highlight the type of file you want and click Done. -
Open the generated file: If you selected to print to a file or data-merge file, this option appears and you can check it if you want the file to appear on the screen automatically after generating.
-
Printer: If you chose to send output to a printer, this setting indicates the printer it will be sent to. To change, click the Printer arrow and select the printer. (If this box is left blank, output will be sent to the default printer.)
If you selected to output to a printer, the report is sent to the selected printer.
If you selected to output to the screen, the report appears on your screen in .pdf format.
If you selected to output to a file or data-merge file, a window appears prompting you for a file name, file type, and storage path. Enter the information and click Save. The report file is saved. If you checked Open the generated file, the report file appears automatically in a text editor (for text files) or in a spreadsheet program (for data-merge files).