Event in Rule Window
The Event in Rule window shows the details for each individual event within a rule. Use this window to manage rule events when adding/cloning/editing a rule.
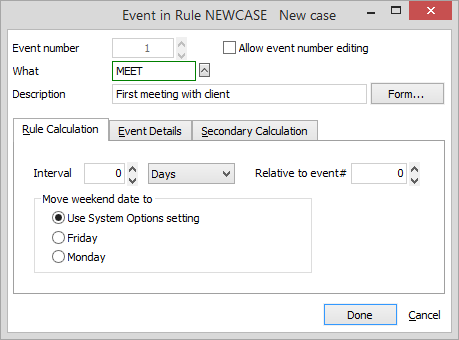
The following describes each setting on the window.
-
Event number: The number of the rule event.
-
Allow event number editing: Check to be able to change the order of the rule events within the rule.
-
What: Code describing the rule event. To change, click the lookup button. The Valid WHAT Entries window appears. Select a What code that describes the event (or add a code on the fly). Click Done.
-
Description: A description of the rule event. This description will be appended to the note for the scheduled event. For example, a rule might include a REMINDER event relative to the task of recording a deposition. The description for the rule might be "Get court reporter."
-
Form: Used to assign a form to the rule event. Click the button, select a form and click Open. If the rule event requires a document to be generated, then this is the form that will be used.
Rule Calculation tab
-
Interval: How many units (days, weeks, months, etc.) that this rule event will be scheduled from its relative, first rule event. Negative intervals create rule events prior to the relative rule event. For example, enter -5 court days for five court days before the relative event. Note that court days are defined as Monday through Friday, excluding holidays. If an interval is specified by months or quarters, the resulting day will be no later than the last day of the correct month.
-
Relative to event#: The number of the rule event in the series that this rule event is dependent upon. If the rule event is the first one in the series or is calculated relative to the trigger rule event, enter 0.
-
Move weekend date to: Indicates what happens if this rule event falls on a weekend where:
Use System Options settings uses the setting that appears in the Events section of the System Options window.
Friday schedules the rule event for the Friday before the weekend.
Monday schedules the rule event for the Monday after the weekend.
Event Details tab
-
Who: Enter any values you want inserted into the rule event. When the rule generates rule events, Who lets you specify a person responsible for this rule event, even if the trigger rule event is scheduled for someone else. Leave this blank and the Who in the generated rule event is taken from the trigger rule event. Note that you can enter an asterisk (*) in the Who box to allow the user to input the Who code when the rule event is used.
-
Priority: The priority code to be assigned to the rule event generated by the rule.
-
Type: The type of event to be assigned to the rule event generated by the rule.
-
Time: The time to be assigned to the rule event generated by the rule. If this field is blank, the generated rule events are scheduled with your default setting. Rule events with this time will not generate scheduling conflicts. If you prefer generated rule events to be scheduled, for example, 8:00 am, click Options in the Rule Name window. A prompt asks for a new time. Type 8 and click Done. You may also set your default time for rule events to "TO-DO." This makes it very easy to separate your appearances (which tend to be calendared individually with a specific time) from all other deadlines and tasks, which rule events tend to generate.
-
Hours: The number of billable hours to assign to the rule event generated by the rule.
Secondary Calculation tab
Specify whether the date of the rule event should be the earlier or later of two calculations. The secondary Interval and Relative to event# fields work the same as the primary calculation.