Do one of the following:
Select Billing > Payments Received. The Enter Client Payments window appears. Click Add.
Click the Enter Client Payments toolbar button.
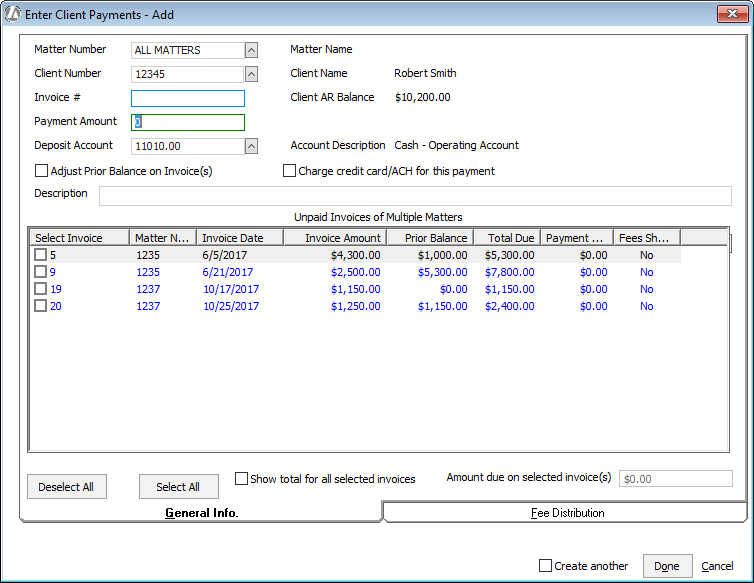
The Enter Client Payments - Add window opens. Leave
Matter Number set to ALL MATTERS and select the client
for Client Number. All unpaid
invoices for the selected client belonging to multiple matters of
the client are listed in the Unpaid
Invoices section. Note that Client
AR Balance is the amount that has been billed
to the client but not paid.
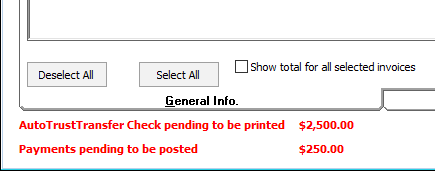
After the client is selected, make note of any
warnings that might be listed in the lower left corner of the window.
You might need to cancel this transaction and correct for the warning.
Warnings will appear if there are any auto trust transfer checks pending
to be printed for the selected client or if there are any pending
client payments pending to be posted for the selected client.
Leave Invoice # blank.
Enter the amount of the client payment in the Payment Amount field. (If this is a negative client payment, enter a minus sign in front of the amount.)
Enter the account number to which the payment is to be applied in the Deposit Account field. (Never use the trust account number!)
When Adjust Prior Balance on Invoice(s) is checked, payments will be applied to invoices’ prior balance first, in first-in, first-out (FIFO) order. When not checked, payments will be applied to the current invoice, and users will have to select more invoices if the payment is greater than the invoice’s balance. NOTE: This option is checked by default if Apply Payments against Prior Balance first is checked in Company Preferences.
Check Charge credit card/ACH for this payment to make the client payment using the credit card or ACH account added for the client. If a credit card/ACH account has not been set up for the client, a form appears and you can set up payment information for the client.
Enter the description of the client payment in the Description field.
The Unpaid
Invoices section lists all unpaid invoices for the selected
client. Unpaid invoices are listed in the order of invoice date, from
the oldest (top of list) to newest (bottom of list). You must check
one of these line items in this section. Notice that when you check
one of these line items, payment breakout information appears on the
right side of the window.
The payment is broken out based on your initial selection of invoices,
starting with the oldest invoice and going in the order of Hard Costs,
Soft Costs, Taxes, Fees, Retainers and Late Charges. If you deselect
an invoice and select another invoice, the payment is not distributed
again by Abacus Accounting. You are responsible for making the appropriate
changes. However, you can deselect all invoices and then select the
correct invoices for payment, and the application will distribute
payment again.
Check the invoices to apply the payment. The payment breakout shows
that the payment is applied to the total of the checked invoices.
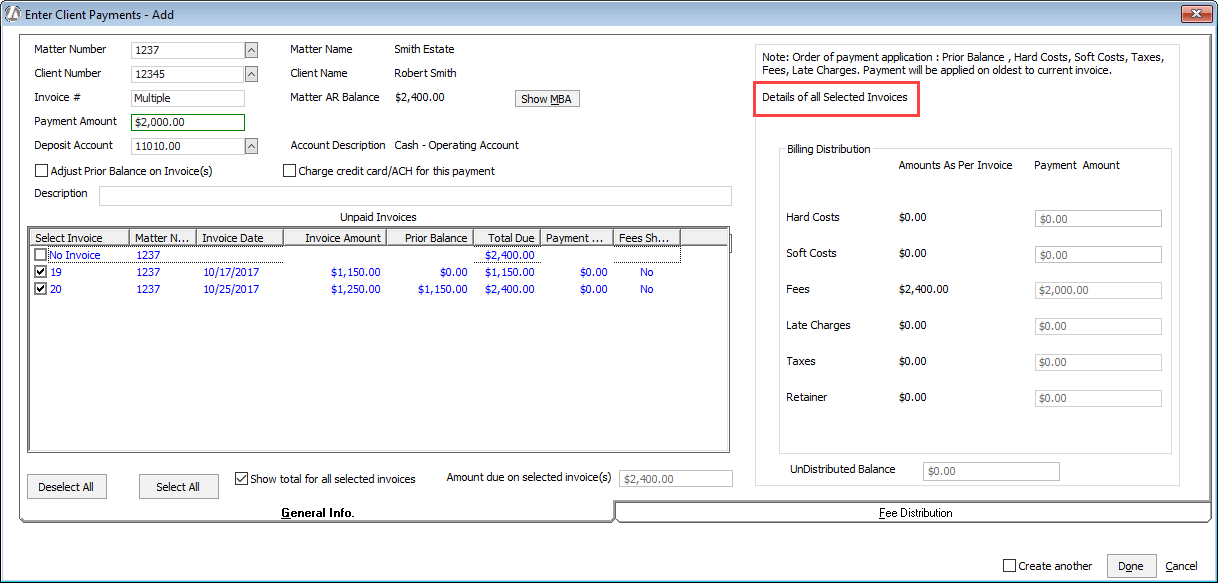
To know how the payment will be distributed
to each invoice, uncheck Show total
for all selected invoices. Then, highlight the invoice line
item to see how the payment will be applied to that invoice. Edit
these amounts as desired.
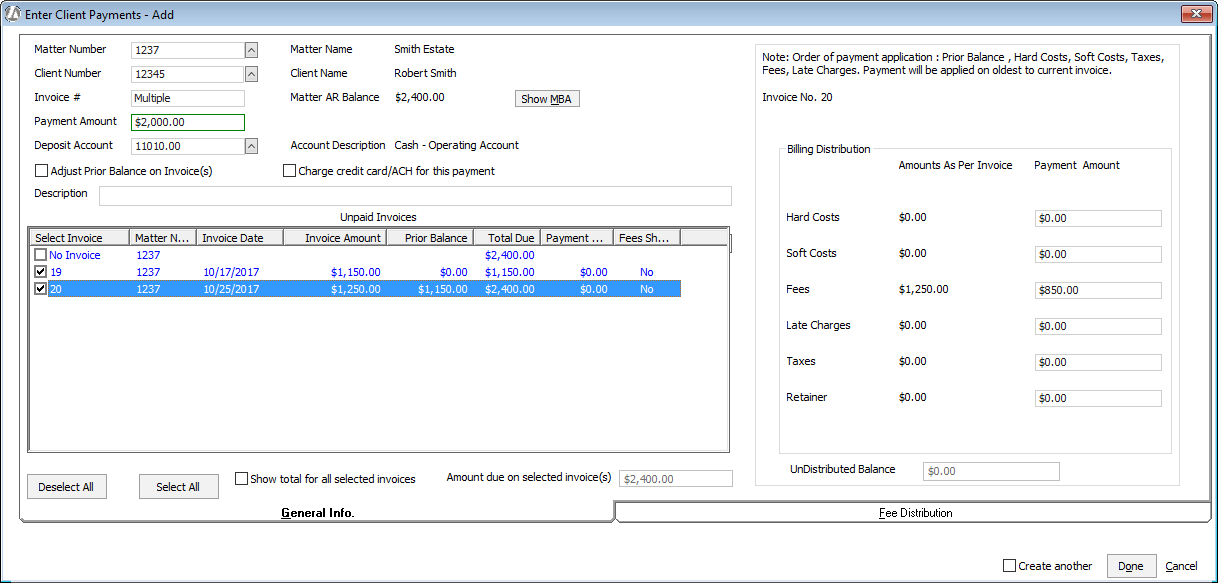
For example, assume that the payment of $2,000 is being applied to
invoice 19 ($1,150.00) and invoice 20 ($1,250.00). To find out how
the payment will be applied to each invoice, uncheck Show
total for all selected invoices. Highlight invoice
19 to see that it will be paid in full ($1,150.00):

Then, highlight invoice 20 to see that the remainder of the payment
($2,000.00 - $1,150.00 = $850.00) will be applied:
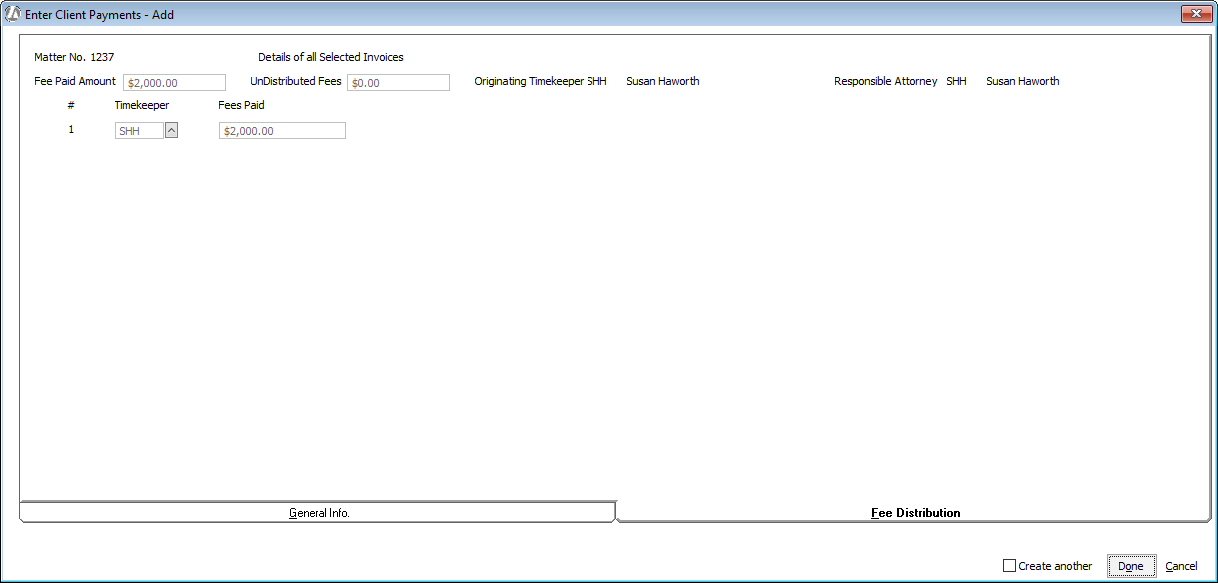
Select the Fee
Distribution tab. This tab is used to enter information about
how the fees portion of the payment is to be distributed amongst the
timekeepers. The fee is distributed to timekeepers in the proportion
of total fee due and total fee received for each selected invoice.
NOTE: If you entered retainer fees in the breakout fields, use a dummy
timekeeper (like RET) to receive the retainer funds. This way you
don’t have to guess which timekeeper will work against the retainer.
After the work has been done, make a negative deposit against the
RET timekeeper. Then, enter a deposit for the correct timekeepers.
This will redistribute the retainer funds so that the correct people
are credited for the work.
Change the fee distribution amounts as necessary. To add more timekeepers
click Add Timekeeper. You
can add up to 35 timekeepers. NOTE: When multiple invoices are selected
for the payment, you can only make changes to fee distribution if
Show total for all selected invoices
is unchecked and an invoice is highlighted on the General
Info tab.
UnDistributed Fees must be zero (0)
before you will be able to save the client payment.
Click Done.
The client payment is listed in the Enter Client Payments window. Post the client payment. NOTE: Don’t forget to post your client payment or it won’t appear in the matter billing activity!