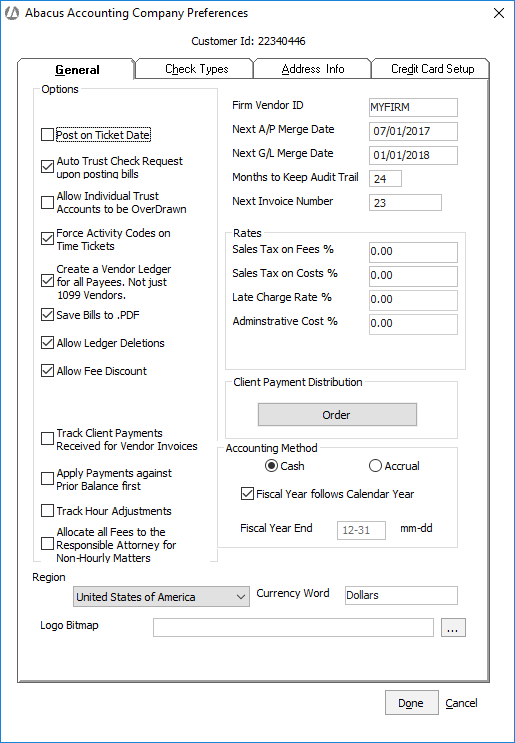
Select File > Setup > Company Preferences. The Abacus Accounting Company Preferences window appears. Select the General tab.
Use the following to help you change the settings on the window:
-
Post on Ticket Date: When checked, bills will be posted to productivity reports using the date on the time ticket instead of the date on the bill.
-
Auto Trust Check Request upon posting bills: When checked, the Automatic Trust Transfers feature is turned on. and Abacus Accounting will automatically create a trust check request for all bills that have trust transfers. The request is made at the time the actual bill is posted. Note that the process is not completely automated. Although a trust check request is generated to apply trust money to the bill, you will still need to process the trust check request.
-
Allow Individual Trust Account to be OverDrawn: When checked, Abacus Accounting will allow you to withdraw more money from a trust account than is deposited.
-
Force Activity Codes on Time Tickets: When checked, Abacus Accounting will force you to include an activity code for each time ticket.
-
Create a Vendor Ledger for all Payees. Not just 1099 Vendors: When you add a vendor through AbacusLaw, you are asked if you want to make the vendor a billing vendor or not. Vendor ledgers are usually only created for billing vendors. Check this option if you want to create a vendor ledger for all vendors (not just for billing vendors).
-
Save Bills to .PDF: When checked, a .pdf copy of a posted bill will always be automatically linked to the related matter (as seen from the Linked Docs tab on the Matters window in AbacusLaw).
-
Allow Ledger Deletions: When checked, the user is allowed to delete entries from the General Ledger.
-
Allow Fee Discount: When checked, fee discounts can be applied on a ticket by ticket basis during billing.
-
Track Client Payments Received for Vendor Invoices: Check to have the ability to track client payments made against payables. When checked, the Track Client payments check box appears on the Enter/Post Payables window's Client Section tab. When this option is checked when entering a payable, client payments for the payable will be recorded on the Print AP Checks window's Check Selection tab as well as on the A/P Unpaid Invoice Details with Client Payment Details report. By tracking client payments on payables, you will know when the payable has been completely paid by the client and, therefore, when it is ready to be paid by you.
-
Apply Payments against Prior Balance first: When checked, manual payments will be applied to invoices’ prior balance first, in first-in, first-out (FIFO) order. When not checked, manual payments will be applied to the current invoice, and users will have to select more invoices if the payment is greater than the invoice’s balance. With the option checked, payments created from auto trust transfers will be applied to the invoice’s prior balance first, in FIFO order. When not checked, auto trust transfer payments will be applied to the current invoice first, and then to other invoices in FIFO order. With the option not checked, auto trust transfer payments created from Statements of Accounts will be applied to the last invoice first, and then to other invoices in FIFO order.
-
Track Hour Adjustments: Turns on the Track Hour Adjustments feature.
-
Allocate all Fees to the Responsible Attorney for Non-Hourly Matters: When checked (turned on), all fees billed/paid are allocated to the responsible timekeeper for flat fee matters. When unchecked (turned off), fees are allocated amongst the timekeepers that worked on the matter during that billing cycle. The total amount of fees allocated to all timekeepers will not exceed the flat fee amount, and the fees allocated to each timekeeper will be in proportion to what they actually worked. In the case where there are no billable time tickets in the billing cycle, the full flat fee amount is allocated to the responsible timekeeper.
-
Firm Vendor ID: When using the Auto Trust Check Request upon posting bills feature, you need to set up your firm as a vendor and then enter the firm vendor ID here.
-
Next A/P Merge Date: The next date you want Abacus Accounting to prompt you about recurring account payables you have to merge. This date will increment by a month once the entries have been merged.
-
Next G/L Merge Date: The next date you want Abacus Accounting to prompt you about recurring journal entries you have to merge. This date will increment by a month once the entries have been merged.
-
Months to Keep Audit Trail: The number of months you want the system to maintain the audit trail information.
-
Next Invoice Number: (optional) Enter the next starting invoice number.
-
Rates: The rates to be used as default rates for sales tax, late charges, and administrative costs that will be used when adding new matters to the system. These rates can be customized by matter. Note that Sales Tax Limit on an Invoice restricts the sales tax to the set maximum limit on each invoice, and it is only applicable to clients with a company address in Alaska. You will only see this field if State is set to AK on the Company Preferences window's Address Info tab.
-
Client Payment Distribution: Lets you select the order in which client payments are allocated by default. Click Order to open the Client Payment Distribution Order window. Select the order you want for the client payment allocation and click Done.
-
Accounting Method: Select whether your law firm uses the cash or accrual accounting method.
-
Fiscal Year follows Calendar Year and Fiscal Year End: If your fiscal year is the same as a calendar year, then check Fiscal Year follows Calendar Year. If your fiscal year is different from a calendar year, do NOT check Fiscal Year follows Calendar Year and enter the month and day (in mm-dd format) that your fiscal year ends in the Fiscal Year End box..
-
Region: Select your firm’s region.
-
Currency Word: The term to be used for currency.
-
Logo Bitmap: Click the browse button and select the location of the image file (.bmp) you want to appear on your actual bills. The logo image file needs to be 1 inch x 1 inch.
Click Done to save your changes.