Sending Emails
You can send an email to one name or a tagged or queried group of names.
When email is sent to multiple recipients, it is sent via blind carbon copy (BCC). This means that all selected recipients will receive an email, but the recipients will only see their own names in the To field. They will not see any of the other names to which the email was sent. The number of recipients allowed could be limited by your email program as to how many addresses can be included in the BCC recipient list.
-
Do one of the following to initiate the email:
-
To send a blank email:
-
From any email address in any field in Abacus, right-click it and select Email.
-
Select Emails > Browse All email. the All Emails window appears. Click New.
-
From the Names Browse window, tag or set a query to identify the recipients of the email. Then, click Actions and select Send Email.
-
On the Name window's Standard tab, click the Send Email button (
 ) next to the email address if you want to send the email to the current name.
 -
On the Name window's Standard tab, set a query for the names to email. Then, select Names > Send Email to All.
-
On the Name or Matter window's Emails tab, click New.
-
On the Matter window's Linked Names tab, tag or set a query to identify the recipients of the email. Then, click Actions and select Send Email.
-
On the Name window's Names tab, tag or set a query to identify the recipients of the email. Then, click Actions and select Send Email.
-
-
To send an email with a note:
-
On the Name or Matter window's Notes tab, if you want to email only one note, right-click the note and select Email current Note. If you want to email more than one note, tag them. Then, right-click the list and select Email tagged Notes.
-
Select Notes > Browse All notes. The All Notes window appears. If you want to email only one note, right-click the note and select Email current Note. If you want to email more than one note, tag them. Then, right-click the list and select Email tagged Notes.
-
-
To send an email with a document attached:
-
On the Name or Matter's Docs tab, if you want to email only one document, right-click the document and select Email > Email Document. If you want to email more than one document, tag them. Then, right-click the list and select Email > Email tagged Documents.
-
From the Document Manager, if you want to email one document, highlight the document in the list; if you want to email multiple documents, tag them. Then, right-click and click Email.
-
-
To send an email with event information, use this procedure.
-
-
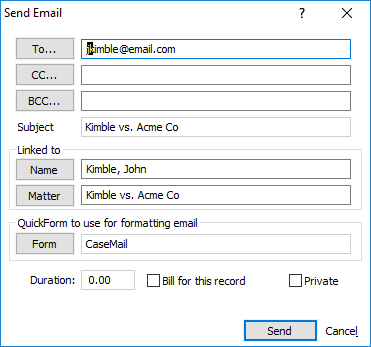
Complete the settings on the Send Email window.
-
To, CC, BCC: The main recipient, the carbon copy recipient, or the blind carbon copy recipient. Click the appropriate button. Two menu options appear: Related names and All names. If you want to only see a list of names related to the selected name, select Related names. If you want to see a list of all names regardless of the selected name, select All names. From the list of names that appears, select the names you want and click Open.
-
Subject: If you initiated an email from the Name window, then the Subject line includes the name. If you initiated an email from the Matter window, then the Subject line includes the matter. You can change the text as you like.
-
Linked to: If you initiated an email from the Name window, then the linked-to name will be the selected name. If you initiated an email from the Matter window, then the linked-to matter will be the selected matter. Click the Name button to link a name to the email or click the Matter button to link a matter to the email.
-
QuickForm to use for formatting email: The Quick Form that will be used to initialize the message body. You can create any number of forms to use as "templates" for common boilerplate text combined with data fields. To change the Quick Form, click Form. Click here for more information about generating documents using Quick Forms.
-
Duration: The billable hours spent on the email.
-
: Check to bill the duration hours for the email. This option is only available when the linked matter has a linked BILLTO name. NOTE: The default selection for this option is set by the Bill emails started from within Abacus option on the Outlook Integration window.
-
Private: When checked, the email will only be seen on the Emails tab by the operator that created it. Click here for more information about controlling privacy.
-
-
Click Send. The email appears in an email window.
-
Make any edits to the email as necessary and send the email.