Select File > Setup > Billing Format Codes. The Billing Format Codes Browse window appears.
Do one of the following to open the Billing Format Code Maintenance window:
To add a billing format code, click Add.
To edit a billing format code, highlight the code and click Edit.
Complete the settings on the General
Information tab as follows.

Code: Enter up to 3 alphanumeric characters to uniquely identify this billing format. (We recommend you use alphabetic codes.)
Description: Enter up to 50 alphanumeric characters to describe this billing format. This description is printed on prebills and reports.
Message: Enter up to 5 lines of text to be printed on the bill. Press the Tab key at the end of each line to move to the next line. Each line is processed as a separate line of text and is centered on the bottom of your bill.
For example, if you enter the following text:
Thank you for your prompt payment. [TAB]
If you have any questions about this bill, [TAB]
please contact Mary Smith at extension 1234.
The text is printed on your bills as:
Thank you for your prompt payment.
If you have any questions about this bill,
please contact Mary Smith at extension 1234.Memo Field: (optional) Enter a memo to appear on bills using this billing format code.
Template for Prebills: Enter the billing template for prebills.
Template for Bills: Enter the billing template for actual invoices.
Template for Statement of Account: Enter the billing template for statements of account.
Billing Email Template: Select the billing email template (or create a new one) to use for the billing format code.
Select the Reporting
Options tab. This tab determines which information is to be
included on the bills. Complete the settings on the tab as follows:
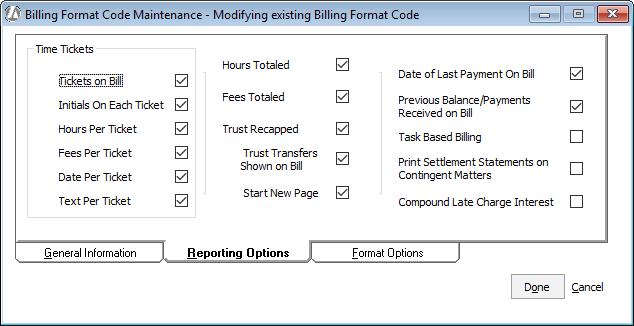
Tickets on Bill: Check to include time ticket information on the bill.
Initials On Each Ticket: Check to include the timekeeper’s initials for each time ticket included on the bill.
Hours Per Ticket: Check to include the hours for each time ticket included on the bill.
Fees Per Ticket: Check to include the fees for each time ticket included on the bill.
Date Per Ticket: Check to include the date for each time ticket included on the bill.
Text Per Ticket: Check to include the text description of each time ticket included on the bill.
Hours Totaled: Check to include the total hours of all time tickets for the current billing period on the bill.
Fees Totaled: Check to include the total fees of all time tickets for the current billing period. Printed at the end of the time ticket section of the bill.
Trust Recapped: Check to include a recap of the transactions (deposits and disbursements) of a client matter’s trust account. Printed at the end of the bill.
Trust Transfers Shown on Bill: Check to include trust transfer transactions on the bill. When checked, during billing Abacus Accounting will check to see if the matter has money in trust, and if so, that money will be applied against the bill.
Start New Page: When checked, all trust information in the bill will begin on a new page.
Date of Last Payment On Bill: Check to include the date the last payment was received on the bill.
Previous Balance/Payments Received on Bill: Check to include the previous account balance and payments received on the bill. Generally, this option should always be checked.
Task Based Billing: Check if your client requires their bill to be generated following the American Bar Association task based billing system. (In order to support task based billing, you must enter task based codes when entering time and billing information.) Leave this field unchecked unless you are sure that task based bills are required.
Print Settlement Statements on Contingent Matters: Check to generate actual bills generated in a settlement statement format for matters set up with a contingency billing mode. When unchecked, an actual bill will be generated using a regular format.
Compound Late Charge Interest: Check to turn on late fee compounding. NOTE: This option is not normally enabled. Check the law with your local jurisdiction to make sure this is permitted.
Select the Format
Options tab. The tab defines additional formatting for the
bill. Complete the settings on the tab as follows:
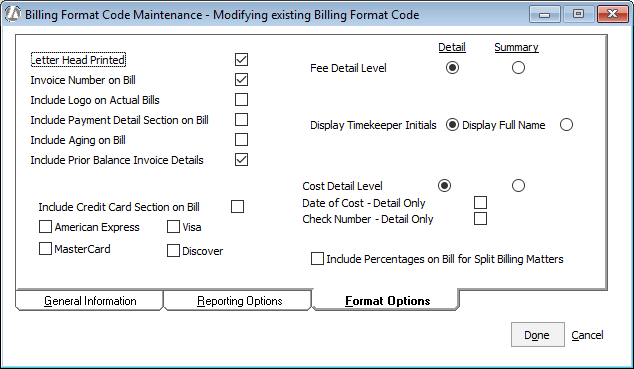
Letter Head Printed: Check to include your firm name and mailing address on each bill. (This information comes from your company preferences.)
Invoice Number on Bill: Check to include the bill number on the bill.
Include Logo on Actual Bills: Check to include a logo on your actual bill. The location of the logo image file is defined in your company preferences. (This option will be greyed out if there is no logo selected for company preferences.)
Include Payment Detail Section on Bill: Check to include a section detailing payments received. A break out of how the payment was applied will be printed on the bill. This breakout shows how much money was applied against fees, hard costs and soft costs.
Include Aging on Bill: Check to include accounts receivable aging information on the bill.
Include Prior Balance Invoice Details: Check to show the details of unpaid invoices for the prior balance on statements of account.
Include Credit Card Section on Bill: Check to include a credit card remittance page with the bill. This will print as a separate page and provides a place for clients to include credit card information to pay their bill. Select the type(s) of credit cards you accept.
Fee Detail Level: Select the type of fee information you want recapped on the bill. Detail includes detailed timekeeper information including hourly rate, hours worked, and total fees of each timekeeper who worked on the matter during the time period covered by the bill. Summary excludes this detailed timekeeper information.
Display Timekeeper Initials / Display Full Name: Select Display Timekeeper Initials to include the timekeeper’s initials on the bill. Select Display Full Name to include the timekeeper’s full name on the bill.
Cost Detail Level: Select the type of cost information you want printed on the bill. Detail includes an itemized list of each cost incurred during the time period covered by the bill. You can also check Date of Cost – Detail Only to include the date of cost in this itemized list and/or check Check Number – Detail Only to include check number information in the itemized list. Summary lists costs incurred during the time period covered by the bill summarized by client expense code (for example, all photocopy charges will be grouped as one amount).
Include Percentages on Bill for Split Billing Matters: Check to include the split billing percentage information on the bill.
Click Done to save your changes.